
Getting Started with Kubernetes on Windows
Kubernetes now supports Windows machines as worker nodes. You can spin up a hybrid cluster and have Windows workloads running in Windows pods, talking to Linux workloads running in Linux pods.
TL;DR - I’ve scripted all the setup steps to create a three-node hybrid cluster, you’ll find them with instructions at sixeyed/k8s-win
Now you can take older .NET Framework apps and run them in Kubernetes, which is going to help you move them to the cloud and modernize the architecture. You start by running your old monolithic app in a Windows container, then you gradually break features out and run them in .NET Core on Linux containers.
Organizations have been taking that approach with Docker Swarm for a few years now. I cover it in my book Docker on Windows and in my Docker Windows Workshop. It’s a very successful way to do migrations - breaking up monoliths to get the benefits of cloud-native architecture, without a full-on rewrite project.
Now you can do those migrations with Kubernetes. That opens up some interesting new patterns, and the option of running containerized Windows workloads in a managed Kubernetes service in the cloud.
Cautionary Notes
Windows support in Kubernetes is still pretty new. The feature went GA in Kubernetes 1.14, and the current release is only 1.15. There are a few things you need to be aware of:
cloud support is in early stages. You can spin up a hybrid Windows/Linux Kubernetes cluster in AKS, but right now it’s in preview.
core components are in beta. Pod networking is a separate component in Kubernetes, and the main options - Calico and Flannel only have beta support for Windows nodes.
Windows Server 2019 is the minimum version which supports Kubernetes.
the developer experience is not optimal, especially if you’re used to using Docker Desktop. You can run Windows containers natively on Windows 10, and even run a single-node Docker Swarm on your laptop to do stack deployments. Kubernetes needs a Linux master node, so your dev environment is going to be multiple VMs.
Kubernetes is complicated. It has a wider feature set than Docker Swarm but the cost of all the features is complexity. Application manifests in Kubernetes are about 4X the size of equivalent Docker Compose files, and there are way more abstractions between the entrypoint to your app and the container which ultimately does the work.
If you want to get stuck into Kubernetes on Windows, you need to bear this all in mind and be aware that you’re at the front-end right now. The safer, simpler, proven alternative is Docker Swarm - but if you want to see what Kubernetes on Windows can do, now’s the time to get started.
Kubernetes on Windows: Cluster Options
Kubernetes has a master-worker architecture for the cluster. The control plane runs on the master, and right now those components are Linux-only. You can’t have an all-Windows Kubernetes cluster. Your infrastructure setup will be one or more Linux masters, one or more Windows workers, and one or more Linux workers:
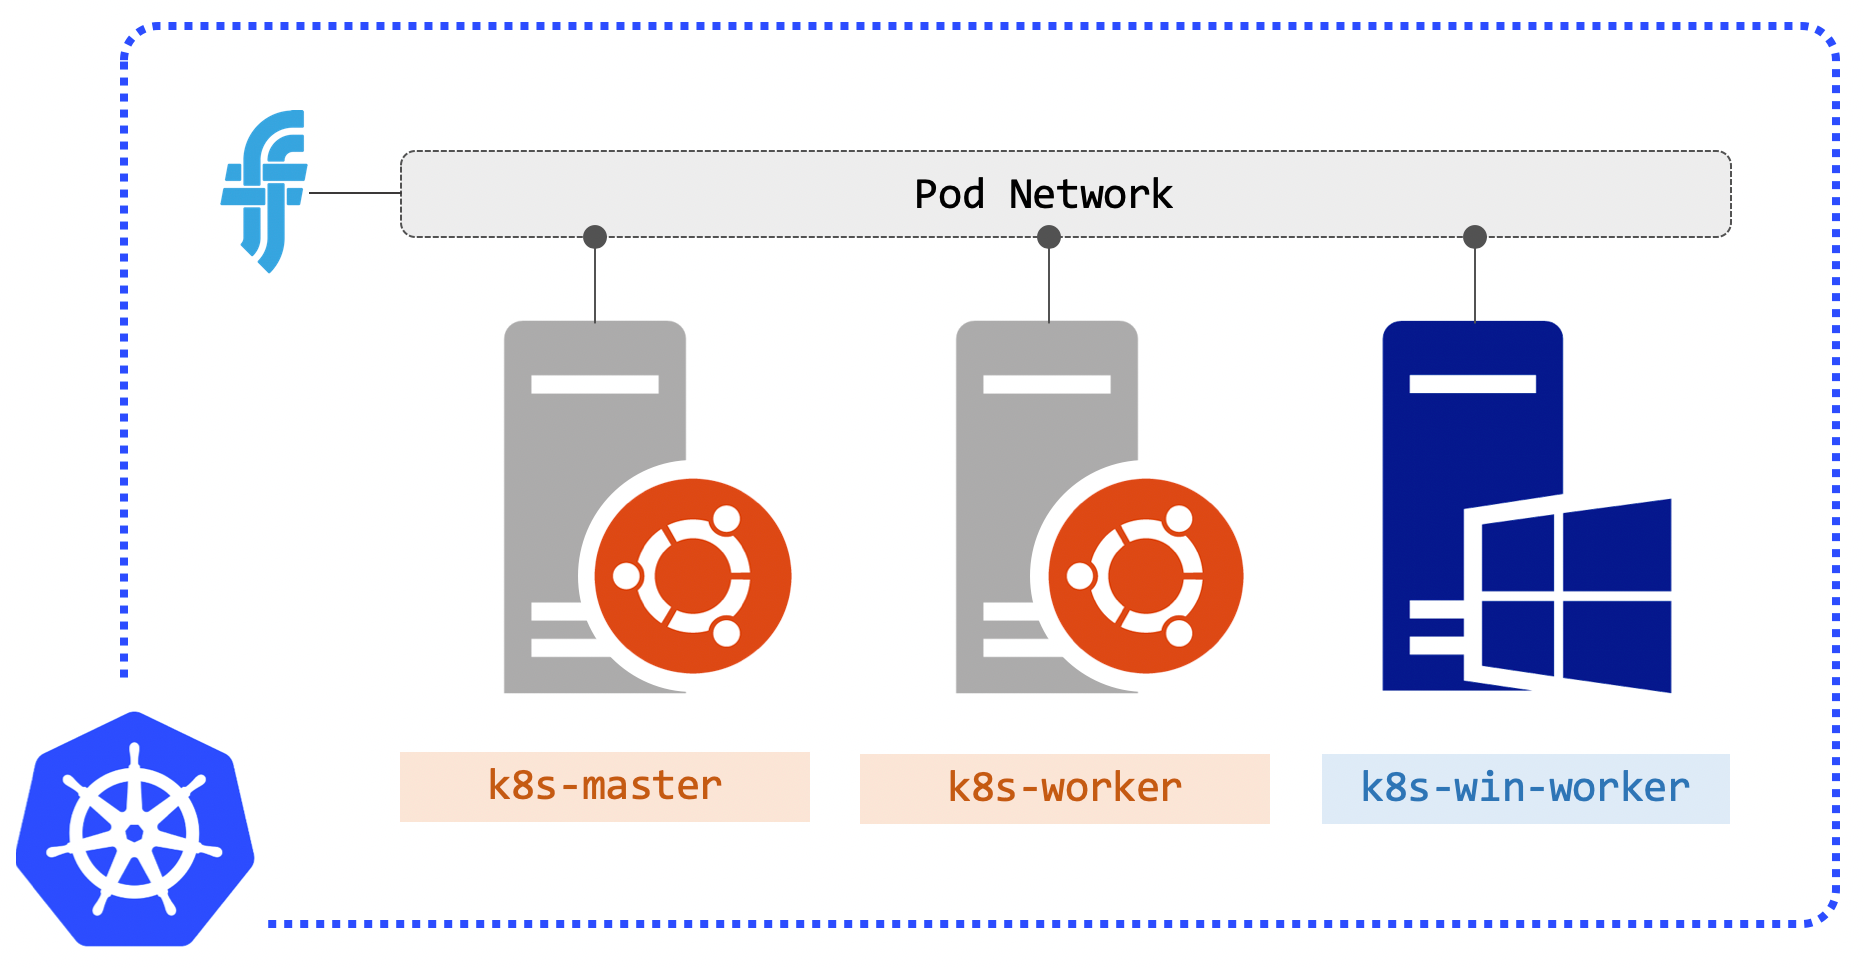
For a development environment you can get away with one Linux master and one Windows worker, running any Linux workloads on the master, but an additional Linux worker is preferred.
You can spin up a managed Kubernetes cluster in the cloud. Azure and AWS both offer Windows nodes in preview for their Kubernetes services:
Kubernetes has a pluggable architecture for core components like networking and DNS. The cloud services take care of all that for you, but if you want to get deeper and check out the setup for yourself, you can build a local hybrid cluster with a few VMs.
Tasks for setting up a local cluster
There’s already pretty good documentation on how to set up a local Kubernetes cluster with Windows nodes, but there’s a lot of manual steps. This post walks through the setup using scripts which automate a much as possible. The original sources are:
- Guide for adding Windows Nodes in Kubernetes - from the Kubernetes docs
- Kubernetes on Windows - from the Microsoft docs
If you want to follow along and use my scripts you’ll need to have three VMs setup. The scripts are going to install Docker and the Kubernetes components, and then:
- initialise the Kubernetes master with kubeadm
- install pod networking, using Flannel
- add the Windows worker node
- add the Linux worker node
When that’s done you can administer the cluster using kubectl and deploy applications which are all-Windows, all-Linux, or a mixture.
There are still a few manual steps, but the scripts take away most of the pain.
Provision VMs
You’ll want three VMs in the same virtual network. My local cluster is for development and testing, so I’m not using any firewalls and all ports are open between the VMs.
I set up the following VMs:
k8s-master - which will become the master. Running Ubuntu Server 18.04 with nothing installed except the OpenSSH server;
k8s-worker - which will become the Linux worker. Set up in the same way as the master, with Ubuntu 18.04 and OpenSSH;
k8s-win-worker - which will be the Windows worker. Set up with Windows Server 2019 Core (the non-UI edition).
I’m using Parallels on the Mac for my VMs, and the IP addresses are all in the 10.211.55.* range.
The scripts assign two network address ranges for Kubernetes:
10.244.0.0/16and10.96.0.0/12. You’ll need to use a different range for your VM network, or edit the scripts.
Initialise the Linux Master
Kubernetes installation has come far since the days of Kubernetes the Hard Way - the kubeadm tool does most of the hard work.
On the master node you’re going to install Docker and kubeadm, along with the kubelet and kubectl using this setup script, running as administrator (that’s sudo su on Ubuntu):
sudo su

curl -fsSL https://raw.githubusercontent.com/sixeyed/k8s-win/master/setup/ub-1804-setup.sh | sh
If you’re not familiar with the tools:
kubeadmis used to administer cluster nodes,kubeletis the service which connects nodes andkubectlis for operating the cluster.
The master setup script initialises the cluster and installs the pod network using Flannel. There’s a bunch of this that needs root too:
sudo su

curl -fsSL https://raw.githubusercontent.com/sixeyed/k8s-win/master/setup/ub-1804-master.sh | sh
That gives you a Kubernetes master node. The final thing is to configure kubectl for your local user, so run this configuration script as your normal account (it will ask for your password when it does some sudo):
curl -fsSL https://raw.githubusercontent.com/sixeyed/k8s-win/master/setup/ub-1804-config.sh | sh
The output from that script is the Kubernetes config file. Everything you need to manage the cluster is in that file - including certificates for secure communication using kubectl.
You should copy the config block to the clipboard on your dev machine, you’ll need it later to join the worker nodes.
Treat that config file carefully, it has all the connection information anyone needs to control your cluster.
You can verify your cluster nodes now with kubectl get nodes:
elton@k8s-master:~$ kubectl get nodes
NAME STATUS ROLES AGE VERSION
k8s-master Ready master 109m v1.15.1
Add a Windows Worker Node
There’s a bunch of additional setup tasks you need on the Windows node. I’d recommend starting with the setup I blogged about in Getting Started with Docker on Windows Server 2019 - that tells you where to get the trial version download, and how to configure remote access and Windows Updates.
Don’t follow the Docker installation steps from that post though, you’ll be using scripts for that.
The rest is scripted out from the steps which are described in the Microsoft docs. There are a couple of steps because the installs need a restart.
First run the Windows setup script, which installs Docker and ends by restarting your VM:
iwr -outf win-2019-setup.ps1 https://raw.githubusercontent.com/sixeyed/k8s-win/master/setup/win-2019-setup.ps1

./win-2019-setup.ps1
When your VM restarts, connect again and copy your Kubernetes config into a file on the VM:
mkdir C:\k

notepad C:\k\config
Now you can paste in the configuration file you copied from the Linux master and save it - make sure you the filename is config when you save it, don't let Notepad save it as config.txt.
Windows Server Core does have some GUI functionality. Notepad and Task Manager are useful ones :)
Now you’re ready to download the Kubernetes components, join the node to the cluster and start Windows Services for all the Kube pieces. That’s done in the Windows worker script. You need to pass a parameter to this one, which is the IP address of your Windows VM (the machine you’re running this command on - use ipconfig to find it):
iwr -outf win-2019-worker.ps1 https://raw.githubusercontent.com/sixeyed/k8s-win/master/setup/win-2019-worker.ps1

./win-2019-worker.ps1 -ManagementIP <YOUR_WINDOWS_IP_GOES_HERE>
You’ll see various “START” lines in the output there. If all goes well you should be able to run kubectl get nodes on the master and see both nodes ready:
elton@k8s-master:~$ kubectl get nodes
NAME STATUS ROLES AGE VERSION
k8s-master Ready master 5h23m v1.15.1
k8s-win-worker Ready <none> 75m v1.15.1
You can leave it there and get working, but Kubernetes doesn’t let you schedule user workloads on the master by default. You can specify that it’s OK to run Linux pods on the master in your application YAML files, but it’s better to leave the master alone and add a second Linux node as a worker.
Add a Linux Worker Node
You’re going to start in the same way as the Linux master, installing Docker and the Kubernetes components using the setup script.
SSH into the k8s-worker node and run:
sudo su

curl -fsSL https://raw.githubusercontent.com/sixeyed/k8s-win/master/setup/ub-1804-setup.sh | sh
That gives you all the pieces, and you can use kubeadm to join the cluster. You’ll need a token for that which you can get from the join command on the master, so hop back to that SSH session on k8s-master and run:
kubeadm token create --print-join-command
The output from that is exactly what you need to run on the Linux worker node to join the cluster. Your master IP address and token will be unique to the cluster, but the command you want is something like:
sudo kubeadm join 10.211.55.27:6443 --token 28bj3n.l91uy8dskdmxznbn --discovery-token-ca-cert-hash sha256:ff571ad198ae0...
Those tokens are short-lived (24-hour TTL), so you’ll need to run the
token createcommand on the master if your token expires when you add a new node
And that’s it. Now you can list the nodes on the master and you’ll see a functioning dev cluster:
elton@k8s-master:~$ kubectl get nodes
NAME STATUS ROLES AGE VERSION
k8s-master Ready master 5h41m v1.15.1
k8s-win-worker Ready <none> 92m v1.15.1
k8s-worker Ready <none> 34s v1.15.1
You can copy out the Kubernetes config into your local
.kubefolder on your laptop, if you want to manage the cluster direct, rather than logging into the master VM
Run a Hybrid .NET App
There’s a very simple ASP.NET web app I use in my Docker on Windows workshop which you can now run as a distributed app in containers on Kubernetes. There are Kube specs for that app in sixeyed/k8s-win to run SQL Server in a Linux pod and the web app on a Windows pod.
Head back to the master node, or use your laptop if you’ve set up the Kube config. Clone the repo to get all the YAML files:
git clone https://github.com/sixeyed/k8s-win.git
Now switch to the dwwx directory and deploy all the spec files in the v1 folder:
git clone https://github.com/sixeyed/k8s-win.git

kubectl apply -f v1
You’ll see output telling you the services and deployments have been created. The images that get used in the pod are quite big, so it will take a a few minutes to pull them. When it’s done you’ll see two pods running:
$ kubectl get pods
NAME READY STATUS RESTARTS AGE
signup-db-6f95f88795-s5vfv 1/1 Running 0 9s
signup-web-785cccf48-8zfx2 1/1 Running 0 9s
List the services and you’ll see the ports where the web application (and SQL Server) are listening:
$ kubectl get svc
NAME TYPE CLUSTER-IP EXTERNAL-IP PORT(S) AGE
kubernetes ClusterIP 10.96.0.1 <none> 443/TCP 6h18m
signup-db NodePort 10.96.65.255 <none> 1433:32266/TCP 19m
signup-web NodePort 10.103.241.188 <none> 8020:31872/TCP 19m
It’s the signup-web service you’re interested in - in my case the node port is 31872. So now you can browse to the Kubernetes master node’s IP address, on the service port, and the /app endpoint and you’ll see this:

It’s a basic .NET demo app which has a sign-up form for a fake newsletter (currently running on .NET 4.7, but it originally started life as a .NET 2.0 app). Click on Sign Up and you can go and complete the form. The dropdowns you see are populated from reference data in the database, which means the web app - running in a Windows pod - is connected to the database - running in a Linux pod:

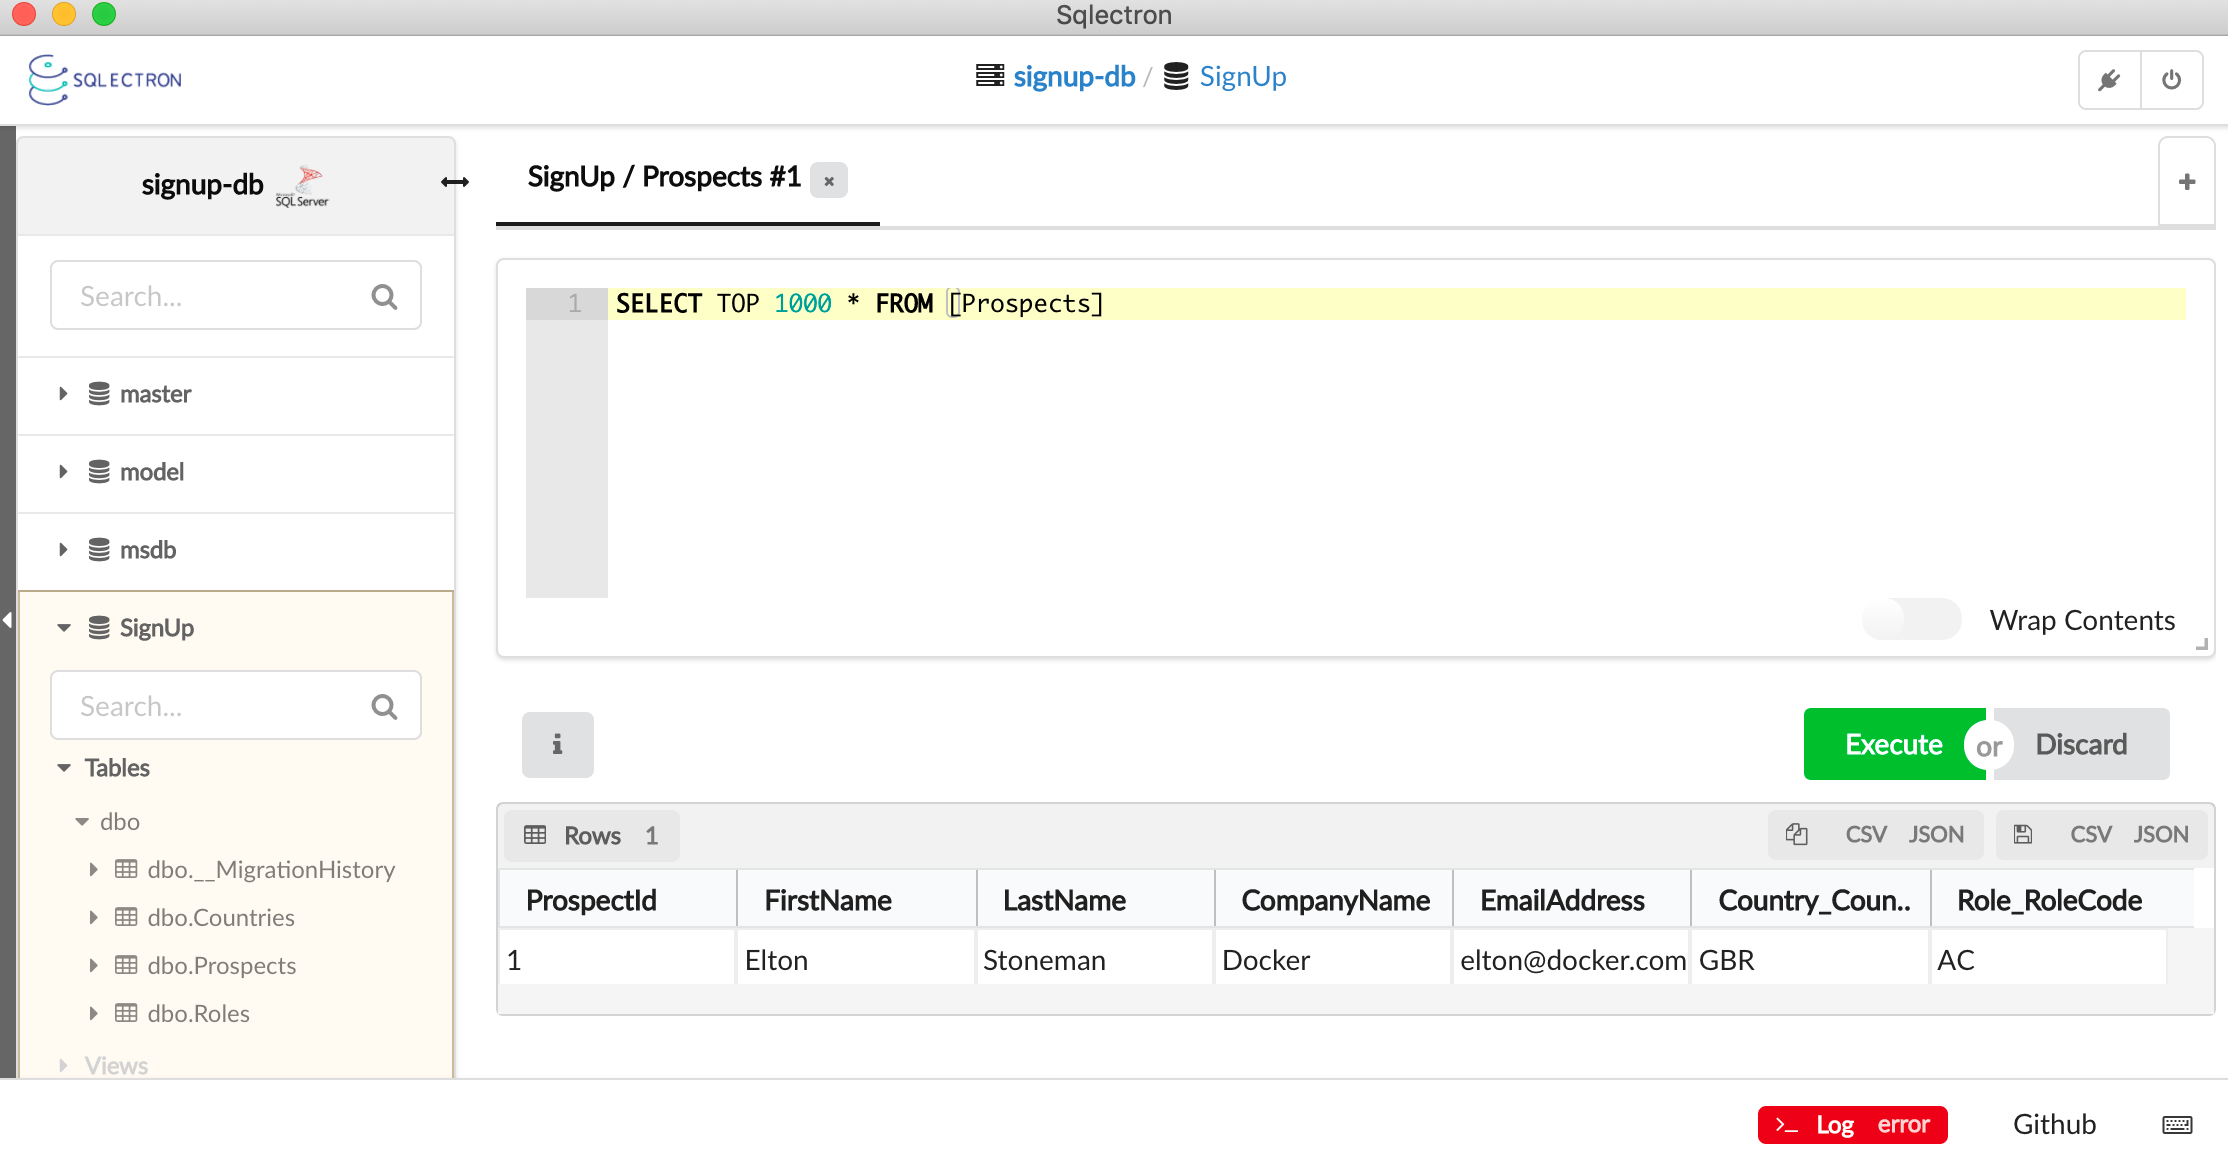
You can go ahead and fill in the form, and that inserts a row into the database. The SQL Server pod has a service with a node port too (32266 in my case), so you can connect a client like SqlEctron directly to the containerized database (credentials are sa/DockerCon!!!). You’ll see the data you saved:
Next Steps
This is pretty cool. The setup is still a but funky (and my scripts come with no guarantees :), but once you have a functioning cluster you can deploy hybrid apps using the same YAMLs you’ll use in other clusters.
I’ll be adding more hybrid apps to the GitHub repo, so stay tuned to @EltonStoneman on Twitter.


Comments