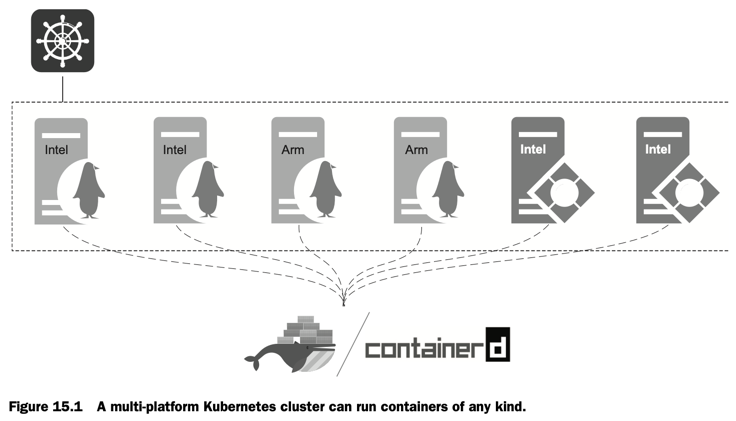
Build runners and the server components all run in the same Kubernetes cluster(s). The servers are Windows and the database is Linux so we run cross-platform clusters with Linux and Windows 2025 nodes. We get regular failures starting up a Windows pod, which effectively stops a runner using that shard from running any tests. In our current architecture we pre-batch the tests for each shard, so a failed server means a whole subset of tests fail (we have an alternative implementation where agents pull tests from a queue, but that’s for another post).
The failure modes differ between platforms: on the on-prem RKE2 cluster it’s containerd sandbox timeouts and DNS dropouts; on AKS it’s disks not attaching. The remedy is usually pretty basic - isolate the bad node for that pipeline run, and delete the pod so it gets scheduled somewhere else. We have watchdog processes doing that with scripts, but that only captures the known failure modes. I wanted to build something with some more intelligence that could actively debug and fix a wider range of issues.
A good case for a custom AI agent, but the team is understandably nervous about hosting an agent inside our Kubernetes clusters and giving it admin-style powers. If the agent had full kubectl access it could do anything, so what might it do by mistake? And would the tokens end up costing more than the compute to run the pipelines? So I built a proof-of-concept with guardrails on cost and capability, using a simple test system and GitHub Actions running on self-hosted runners in my own Kubernetes cluster:
sixeyed/build-medic - Build Medic, an autonomous agent that helps integration test suites run cleanly
TL;DR: Build Medic watches integration-test stacks come up in a Kubernetes build farm. If a stack gets stuck, level 1 remediation is code: a deterministic playbook reconciles known config drift. Level 2 remediation uses the Claude Agent SDK, running an episode to diagnose and repair with hard limits (max $0.50 in token spend and 12 turns). The agent can fix more failure modes, but if it can’t find a fix within its guardrails it escalates to Rocket.Chat with a root-cause analysis. Cost and safety guardrails are enforced in code.
The agent’s brief
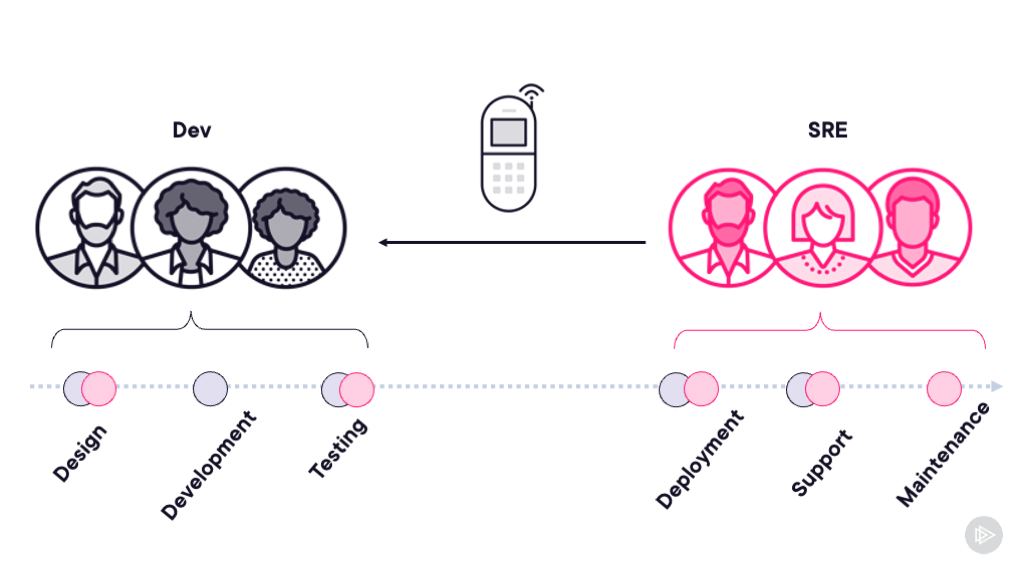
Integration tests should be the most confidence-giving part of the build process. A green IT build is the best kind of testing: real components in a real environment, where tests execute the full path. But when the environment fails, it’s a lot of expensive noise. Build stages are red from failed stack deployments, which go green again when you re-run them manually. In our case that adds another 40 minutes to get a green build, and if there are genuine test failures that’s more time wasted.
This is the job description for Build Medic: watch the test stacks as they come up, fix the ones stuck before their tests run, and make sure a build result reflects the code under test - not random failures in the cluster.
(Yes, we shouldn’t have regular failures in the cluster just starting pods. But these look like genuine Windows OS issues, or failure points between the host compute service and containerd, or the host network service and Flannel, or maybe something in the VMWare virtual networking stack. We’re in the process of collating all the failure details so we can log some issues).
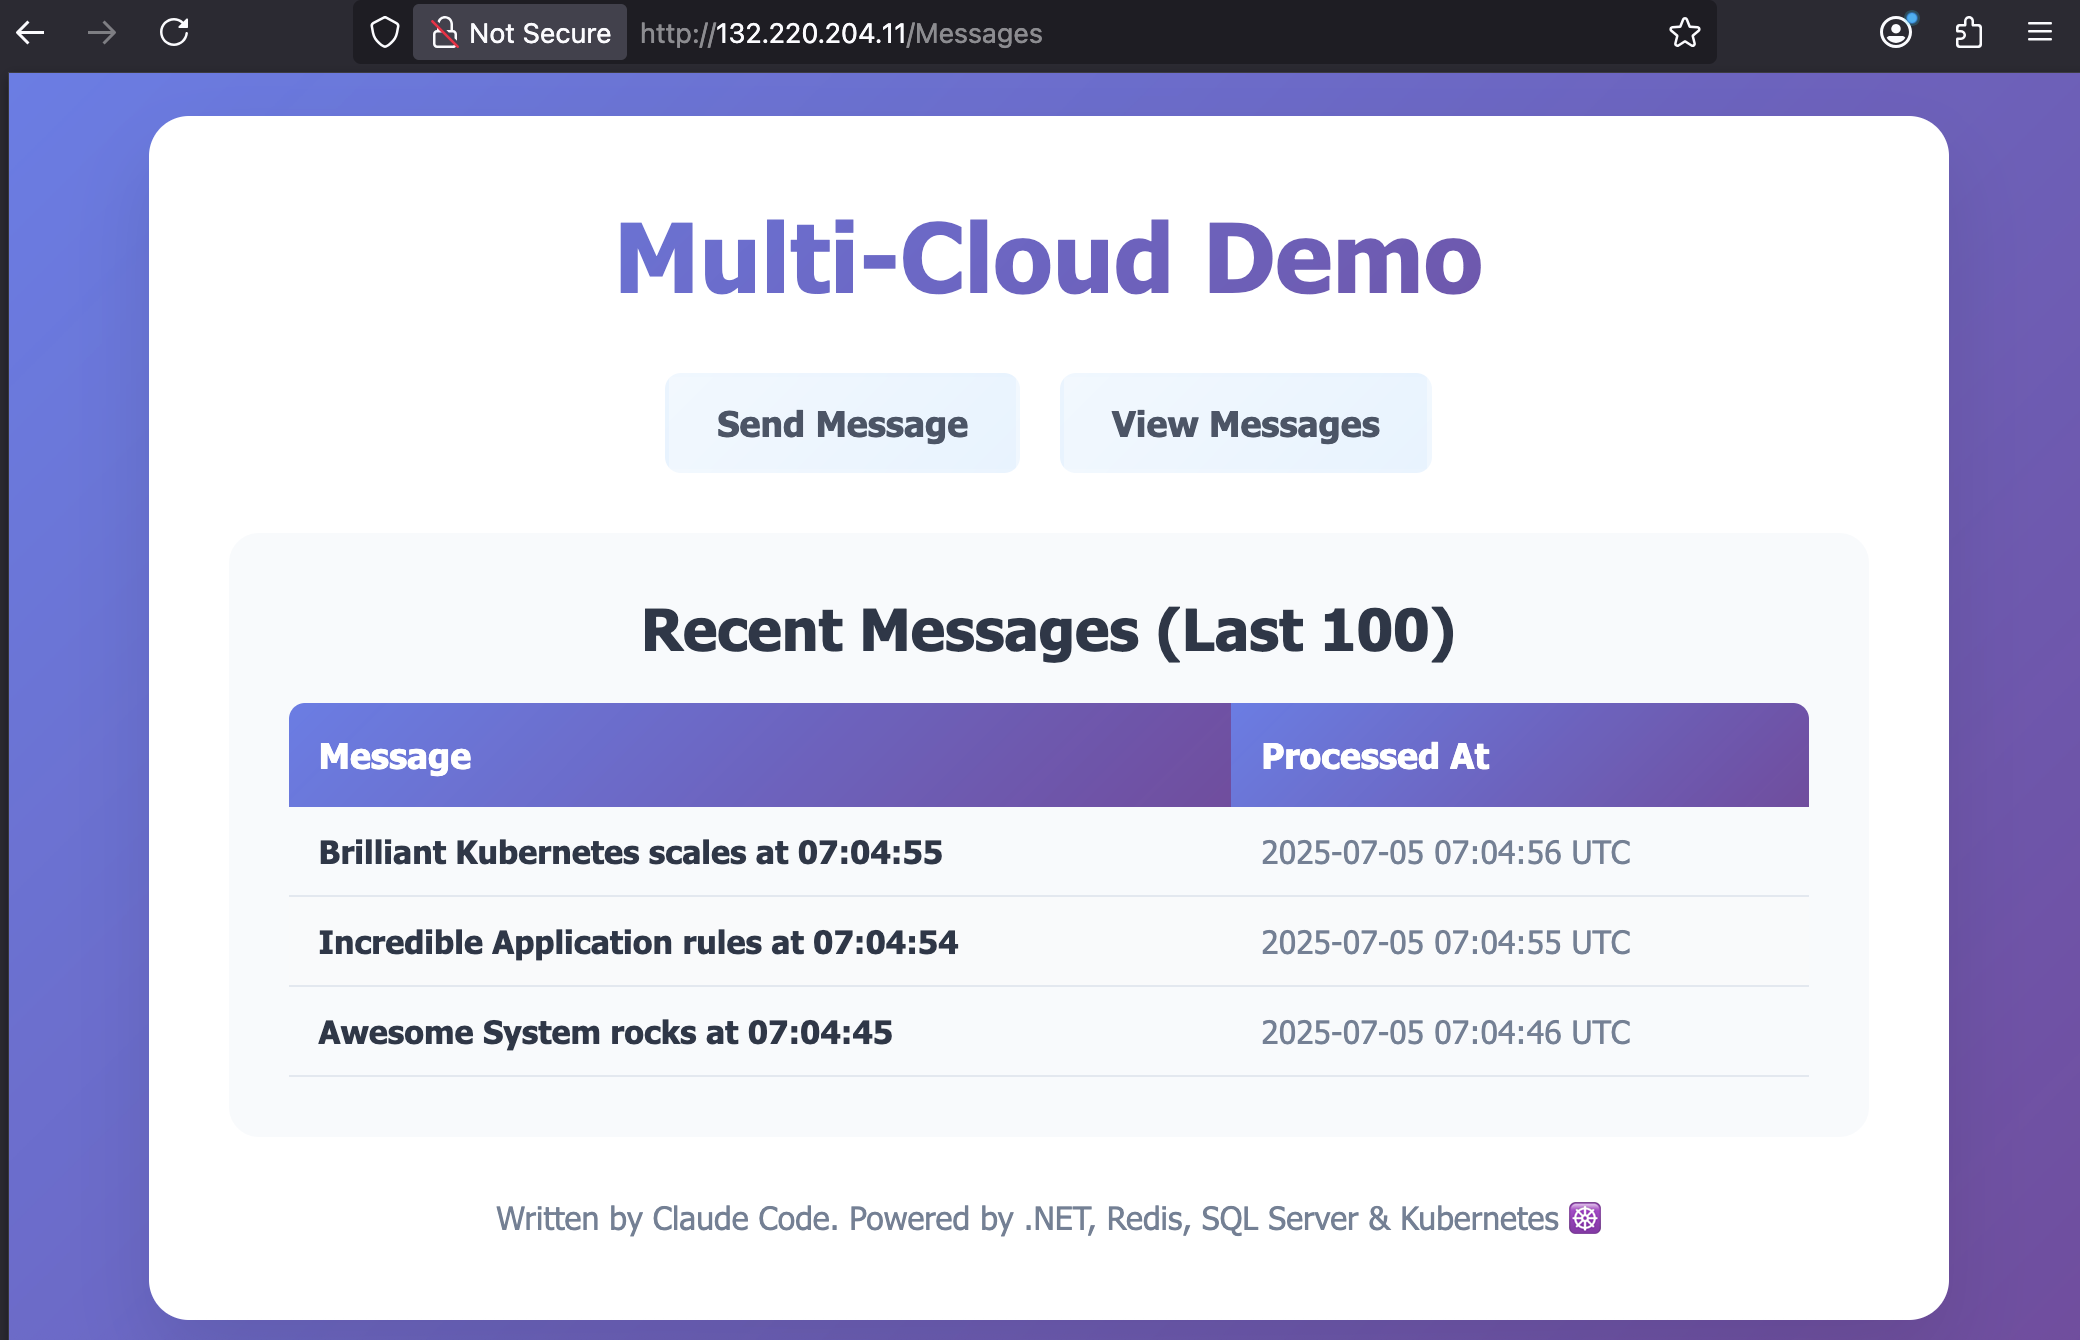
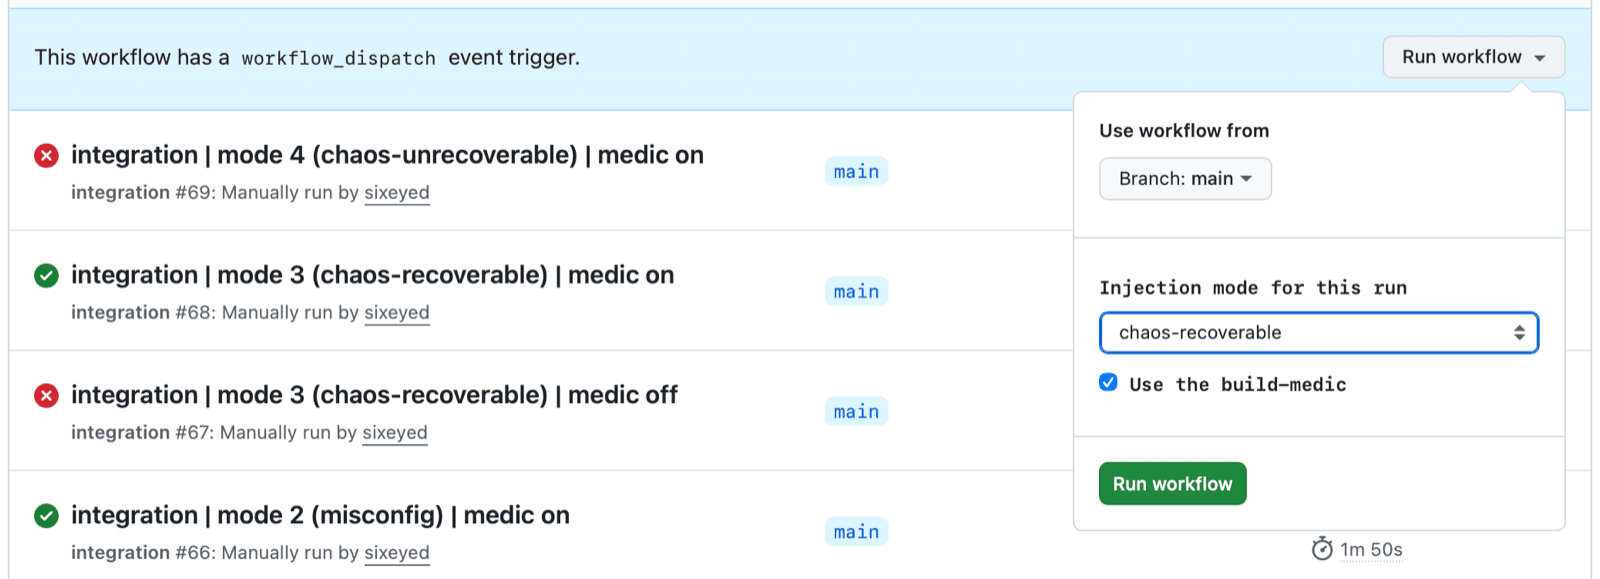
In the sample app, we can trigger a GitHub Actions run from the UI and select from a known set of failure modes (or none), and choose whether or not to use the Build Medic:
The architecture
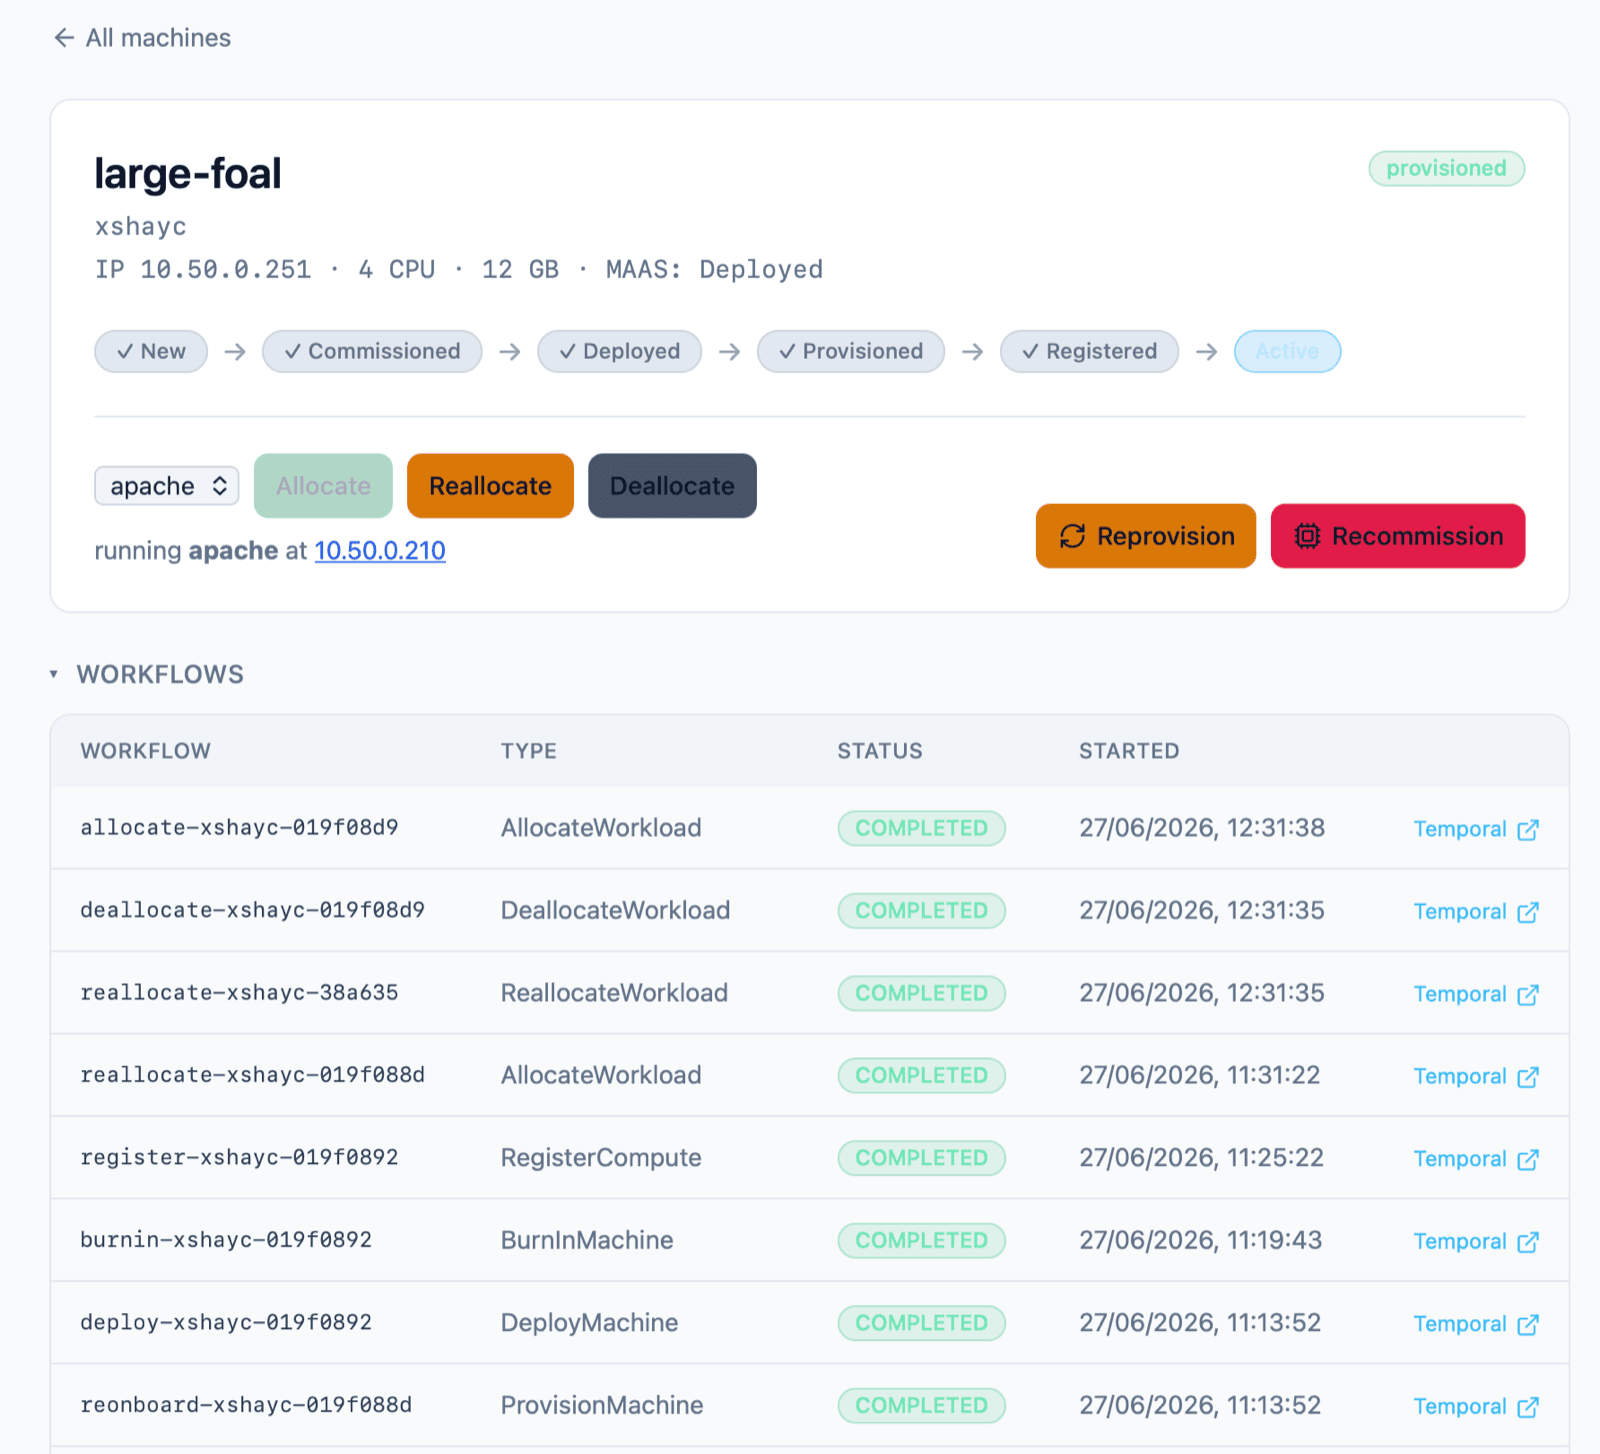
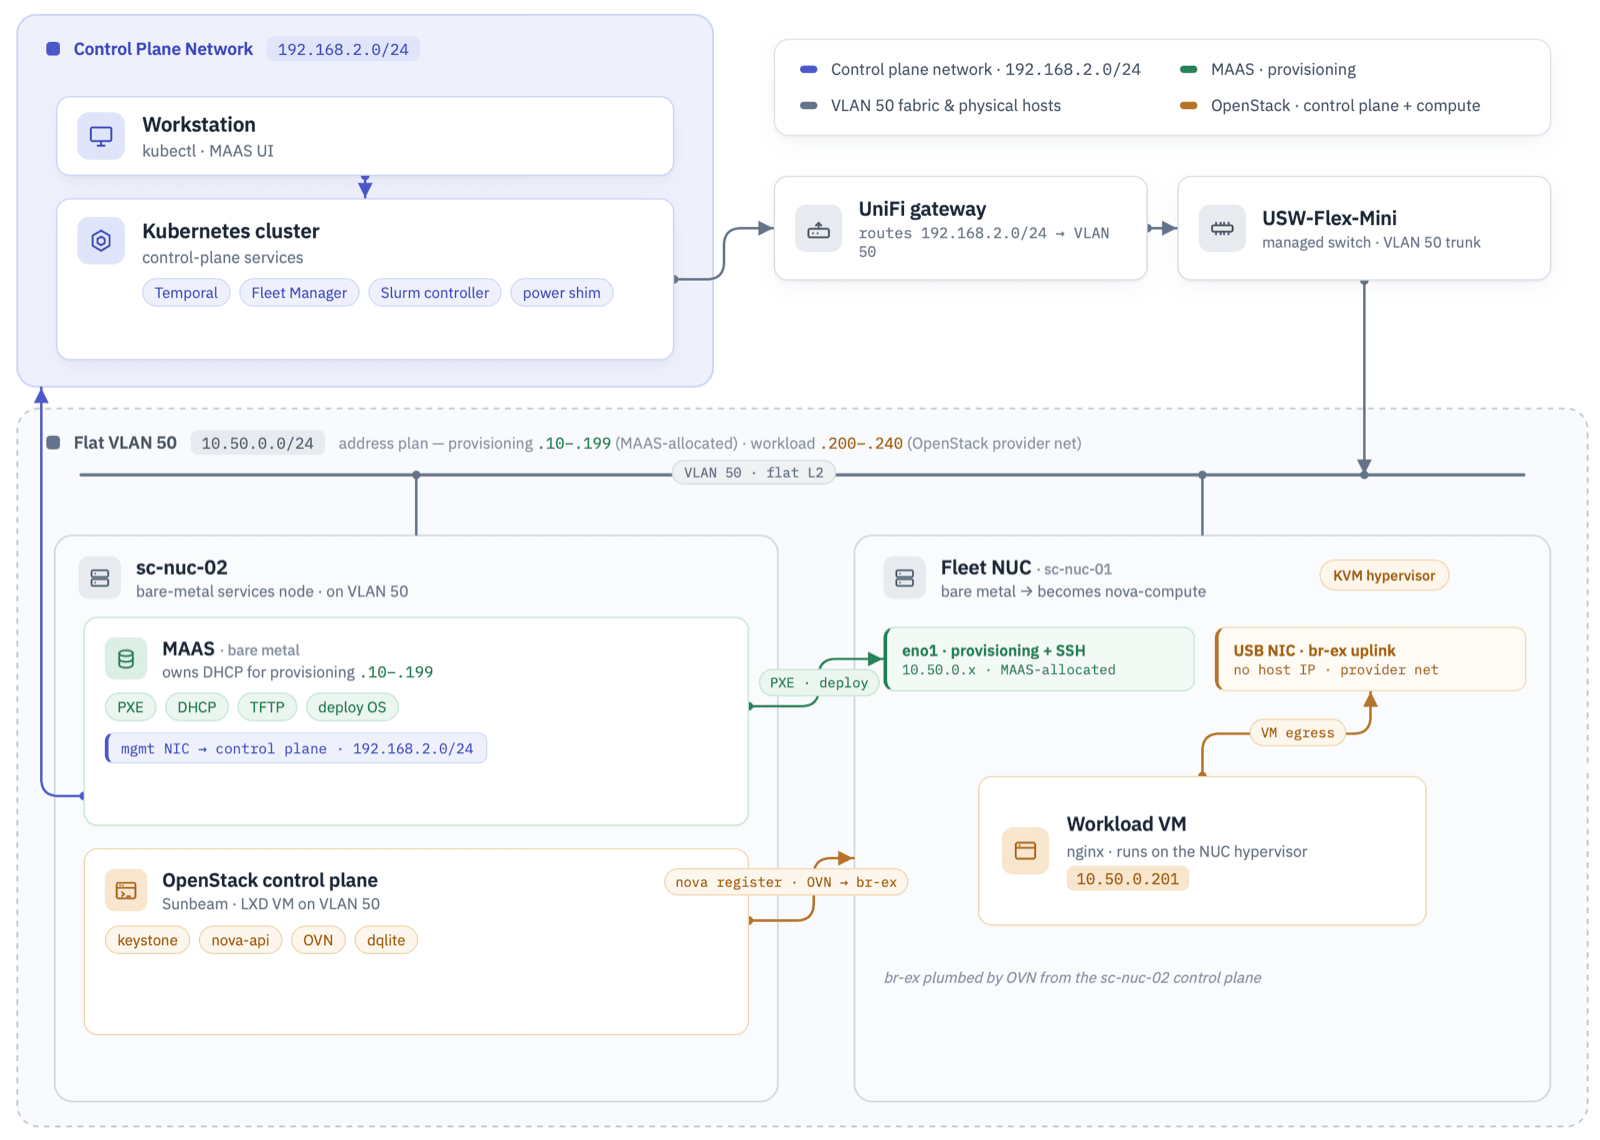
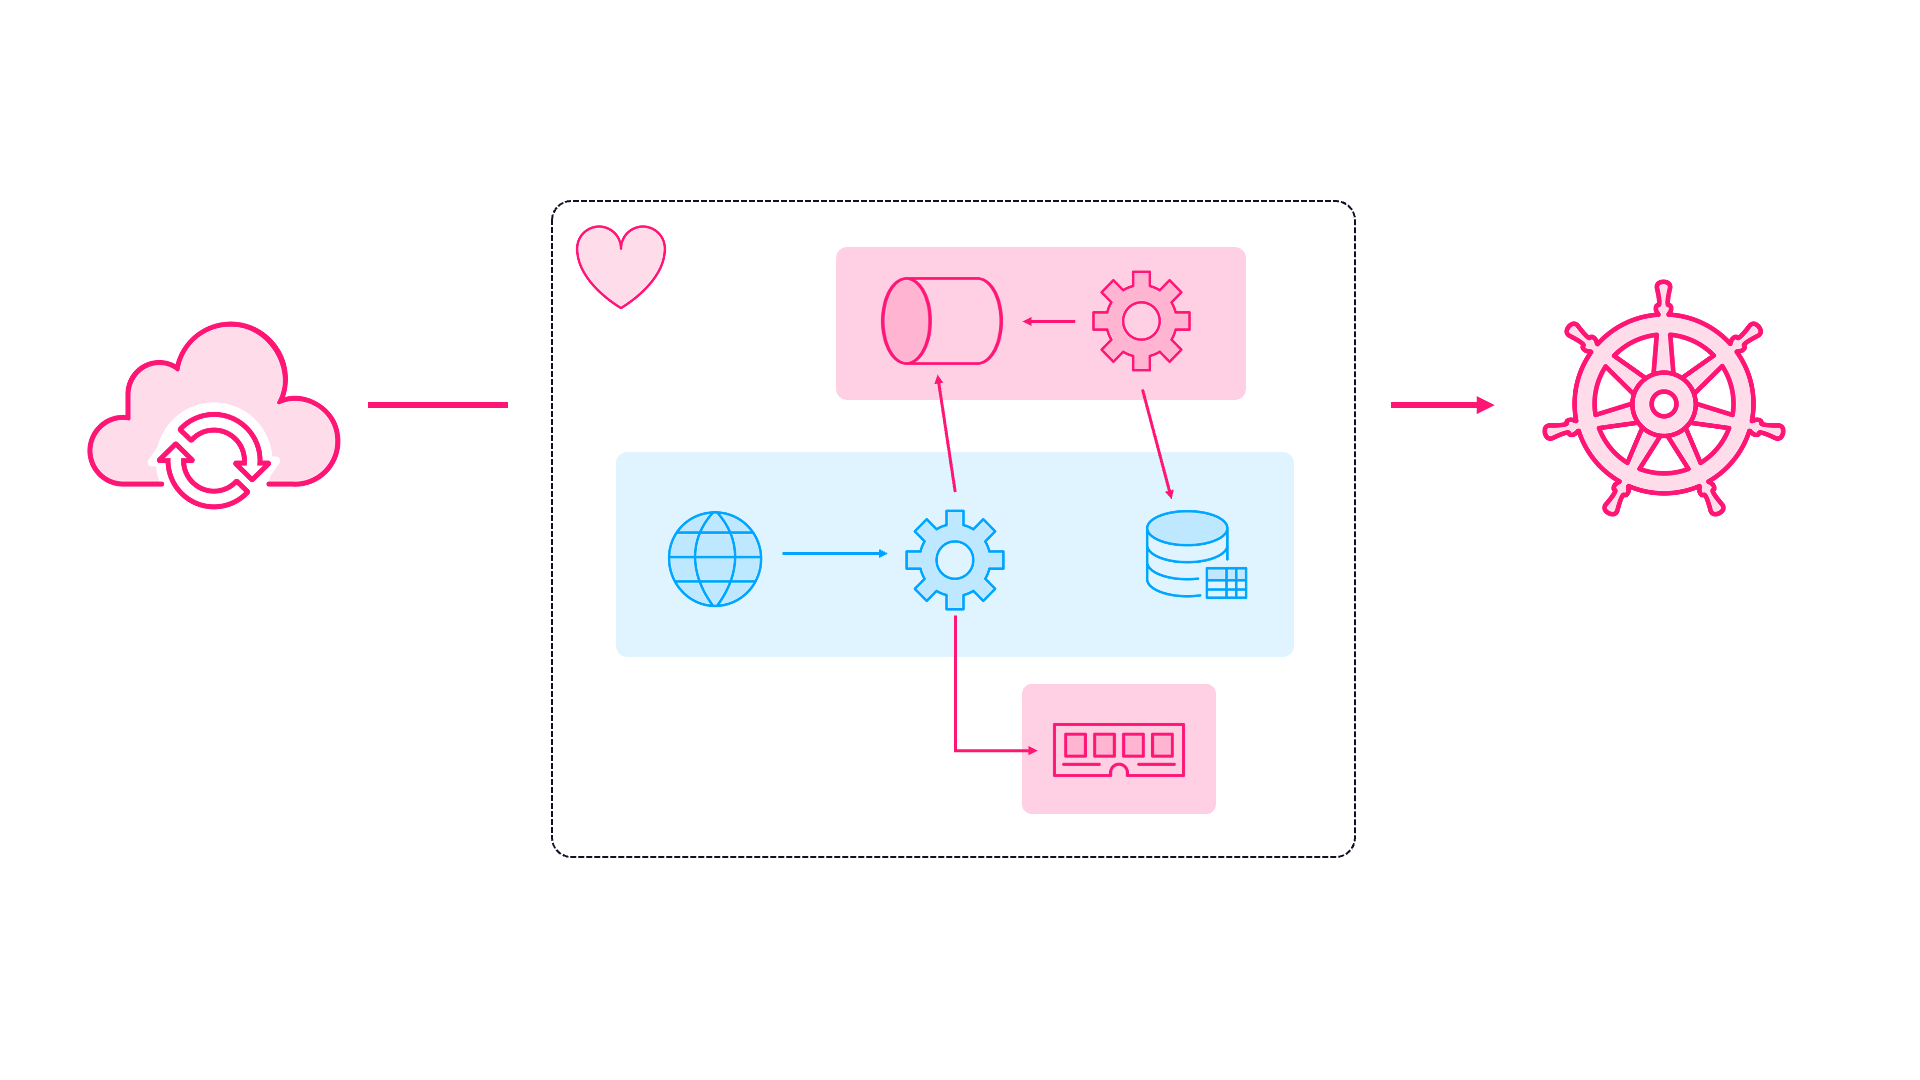
The demo setup is a small build farm running on my Kubernetes cluster. GitHub Actions run the builds on self-hosted runners, using ARC ephemeral runner pods. Every build gets its own namespace, and the test suite is sharded across four clients. Each client deploys its own dedicated stack (a FastAPI server and a Postgres database, both as single-pod StatefulSets) and runs its slice of the tests. A failed stack deployment only blocks its own client, which gives a nice property for the demo: fault one stack and the other three act as a live control group.
Build Medic itself is a single Python Deployment - one replica, stateless - which monitors all the builds in the cluster. Every five seconds it sweeps the namespaces labelled for watching, checks each stack’s health, and applies a debounce window so it ignores pods that are genuinely starting up. A stack that stays not-ready past the window - or hits a terminal state like ImagePullBackOff - triggers a remediation episode.
The stacks use StatefulSets rather than Deployments to mimic the real IT suite. That means the test clients can address their stacks by stable DNS name and it’s easy to correlate logs between test clients and servers - we know client stage 1 for a build will use server-0, which will use db-0.
In the build workflow, test runners wait for their local stack to be ready before they start. The server’s readiness probe powers that, and it’s a genuine test of readiness: /readyz runs a real (short) database query and returns a 503 if the database is unreachable. A permanent failure between the server and the database, or the build runner and the server, means that stage just polls until a timeout.
Tier 1: fixing the easy fixes without AI
Runaway token costs are the scary part of agent deployment. That’s mitigated here because we run the agent as a singleton. In the real pipeline there are seldom more than 5 builds running concurrently, which means about 300 pods to monitor so scale is modest.
And within the Build Medic, we avoid making any model calls until we need to. The Python logic has a playbook built in so it can fix known failure modes without handing off to an AI investigation. In the demo app we simulate real failures. Some are easy to find and fix, others take more work. One failure mode is to inject drift, so the deployed stack is not using the correct spec. Every stack is deployed with declared-intent annotations to capture what should be running:
annotations:
  medic/expected-image: {{ include "stack.expectedImage" . | quote }}
  medic/expected-replicas: {{ .Values.replicas | quote }}
  medic/expected-command: ""     # empty = use image default; a set command is drift
When a stack is stuck, tier 1 of the agent diffs the live spec against those annotations. If it finds drift (which is injected when the build runs with failure mode = misconfig), it applies a JSON Patch to reconcile it - fixing bad image tags, replicas scaled to zero, or failed command overrides. It’s a deterministic playbook and it’s fast and model-free. Known, catalogued failures - simulated here - are fixed silently with zero token spend. We save model usage for the cases that need investigation and judgement.
Tier 2: model investigations with a fixed budget
When tier 1 finds a problem outside of its playbook, the fault is more complex and we move to tier 2. Build Medic can run a custom agent built with the Claude Agent SDK. The investigation is a headless session with a Claude model, where the agent sets its own context and gets its own list of tools. Each episode is an investigate - analyse - act loop over the available data: pod status, Kubernetes events, logs and nodes.
Failure mode chaos-recoverable simulates cluster failure by cordoning all the nodes. The stuck pod reports node(s) were unschedulable and the playbook doesn’t handle that. The agent has to reason its way there: check the pod events, query the nodes, discover the cordon, and then uncordon. That’s complex to encode in a simple playbook find-and-fix rule, but it’s straightforward for Claude.
The conversation is templated in agent.py:
    prompt = (
        f"Stack for client {client_index} in namespace {namespace} is not "
        f"becoming ready. The StatefulSet is `{statefulset}` and its pod is "
        f"`{pod}`. Use the read-only tools (get_pod_events, describe_pod, "
        f"get_pod_logs, get_pod_status) on that exact pod name to diagnose the "
        f"root cause, then apply a single sanctioned remediation if one matches "
        f"(reconcile_to_intent / restart_pod / rollback_release on the "
        f"StatefulSet, or uncordon_node). Run id is {run_id}. If you cannot "
        f"durably fix it — or the fault keeps re-asserting — escalate exactly "
        f"once via the rocketchat tool with run id, namespace, client, stack, "
        f"reason, events summary, and the remediations you tried, then stop."
        f"{link_hint}"
    )
That’s a very specific prompt, and it’s coupled with an equally specific system prompt. We’re deliberately constraining what Claude can do - which adds a layer of safety at the cost of restricting its ability to investigate freely and fix unexpected issues. There’s a balance to find which you’ll get to through experimentation.
Model usage is also configured to enforce more constraints:
return ClaudeAgentOptions(
    system_prompt=SYSTEM_PROMPT,
    allowed_tools=ALLOWED_TOOLS,               # 10 named MCP tools only
    disallowed_tools=_DISALLOWED_BUILTINS,     # Bash/Read/Write/WebFetch/...
    setting_sources=[],                        # no host CLAUDE.md or skills
    can_use_tool=_gate_writes(cfg),            # logs every write for audit
    max_turns=cfg.max_turns,                   # 12
    max_budget_usd=cfg.max_budget_usd,         # $0.50 per episode
    model=cfg.model,                           # claude-sonnet-4-6
)
Between the tight prompts and the agent config, we’re encoding guardrails to address both the cost and rogue-actor concerns.
Guardrail 1: token costs
The cost controls are layered, and each layer is a number you can point to in config:
| Layer | Mechanism | Value |
|---|---|---|
| Free first | Deterministic playbook handles catalogued drift | $0.00 |
| Budget cap | max_budget_usd per episode, enforced by the SDK |
$0.50 |
| Turn cap | max_turns per episode - a misdiagnosis can’t loop |
12 |
| Concurrency cap | Semaphore bounds simultaneous episodes | 3 |
| Debounce | No episode for pods that were coming up anyway | 20s |
| Model choice | Sonnet, not a bigger model, for a bounded diagnosis task | - |
| Off by default | No API key → playbook-only mode, everything else escalates | - |
The worst case is fully computable: three concurrent episodes at fifty cents each is the most the agent can cost. This works if the real pipeline has environment failures in 30% of builds and we run max 10 builds concurrently. Builds take at least 70m so the maximum cost at full workload is $1.50 per hour. Every episode logs its actual cost from the SDK’s result message, so you can build up real numbers while you’re iterating.
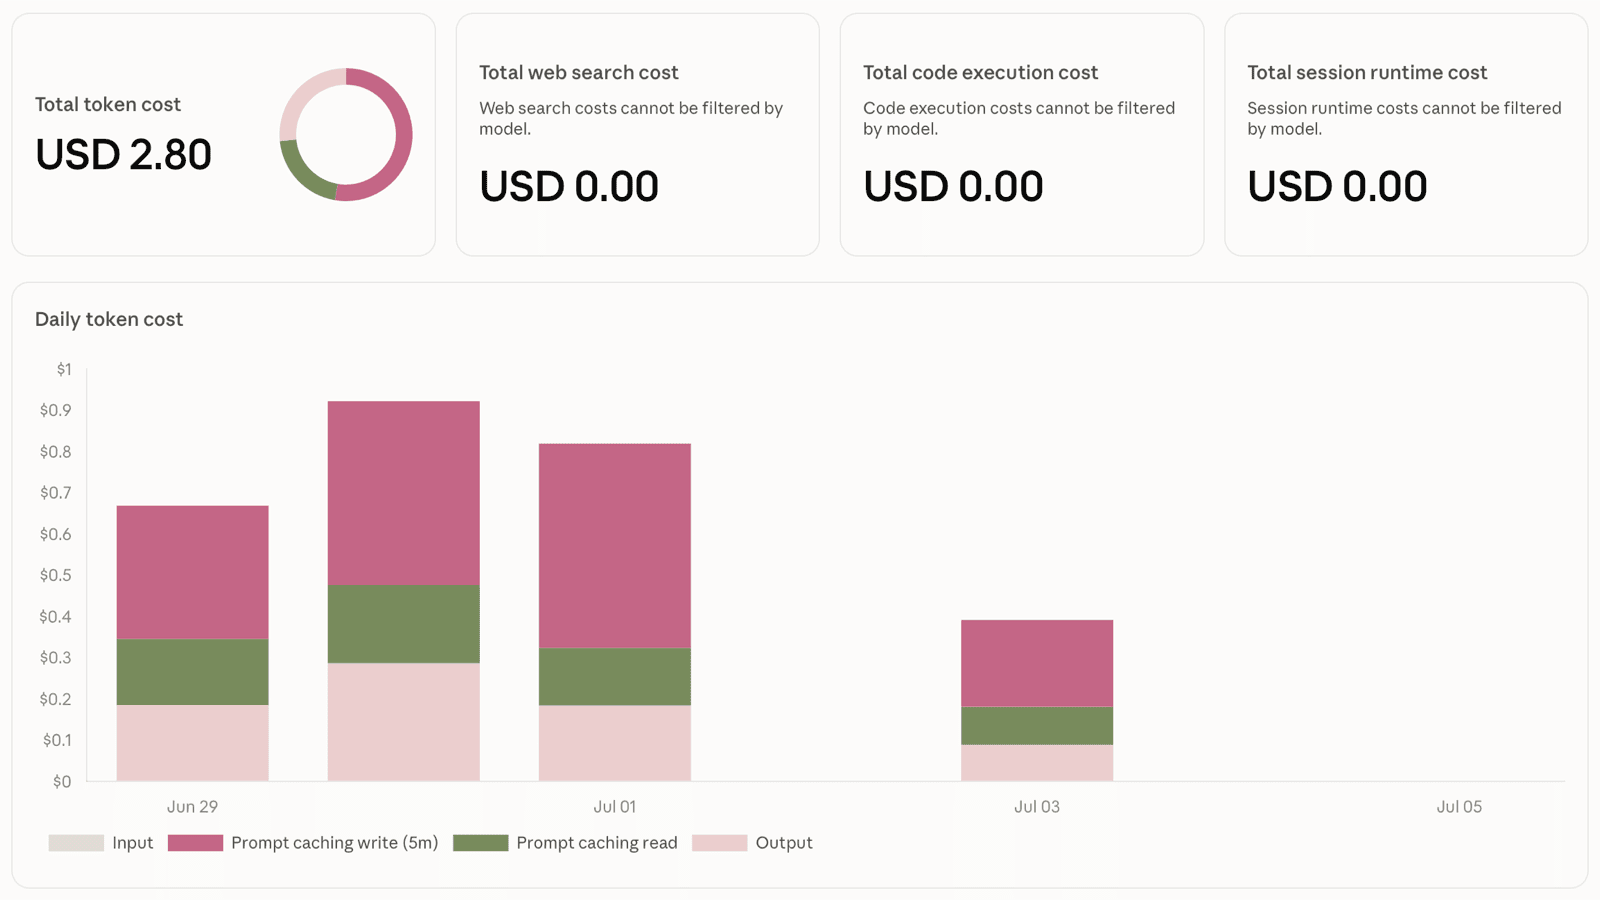
I spent a few days on this project and ran 56 workflows - with a total agent cost of $2.80:
Guardrail 2: agent capabilities
The rogue-actions concern is addressed in code too, at three layers: restricting what the agent can do, auditing what it actually does, and applying external access controls.
First - the tool layer. The agent doesn’t run a shell, and never gets raw kubectl. We explicitly list the tools it’s allowed to use, and they’re provided by custom MCP servers:
ALLOWED_TOOLS = [
    "mcp__k8s__get_pod_status", "mcp__k8s__describe_pod",
    "mcp__k8s__get_pod_events", "mcp__k8s__get_pod_logs", "mcp__k8s__get_nodes",
    "mcp__k8s__reconcile_to_intent", "mcp__k8s__restart_pod",
    "mcp__k8s__rollback_release", "mcp__k8s__uncordon_node",
    "mcp__notify__rocketchat",
]
Five read paths for diagnosis, four write paths for explicit repair actions, one notification call. The SDK ships with all of Claude Code’s built-in tools - Bash, file access, web access, sub-tasks - and Build Medic explicitly disallows them all. We configure setting_sources=[] so the agent doesn’t load any host configuration. We constrain the world of the agent to our prompts and those ten tools.
The MCP servers are small and run in-process in the Build Medic service:
- mcp_k8s.py - uses the Kubernetes client to provide limited access to the cluster: get pod events, restart pod etc.
- mcp_notify.py - wraps a Rocket.Chat client so the agent can post escalation messages
Next - the audit layer. Every write passes through a can_use_tool hook that logs the tool name and arguments, and each episode streams the full message log - diagnosis, tool calls, results, outcome. Every repair or failed attempt is explainable after the fact. When someone asks “did the agent uncordon that node?”, we can find the answer in the logs.
Finally - the platform layer. Even if the model went completely off the rails, we have Kubernetes RBAC to contain any damage. The agent pod runs with a specific ServiceAccount, with a ClusterRole that only grants the verbs needed for the MCP server. Most actions are specific to pods in the namespace for a specific build run, but uncordoning nodes affects the whole cluster so we gate that with a feature flag in the Helm chart:
{{- if .Values.allowNodePatch }}
  - apiGroups: [""]
    resources: ["nodes"]
    verbs: ["get", "list", "watch", "patch"]   # patch = cordon/uncordon
{{- else }}
  - apiGroups: [""]
    resources: ["nodes"]
    verbs: ["get", "list", "watch"]            # no patch
{{- end }}
Turn that flag off and the capability is gone, whatever the model decides to do. The system prompt also reinforces the boundaries - the agent must confirm a cordon via the node-listing tool before it uncordons anything. But prompts are guidance for the model and they might not be enforced, so a secondary safety measure like this is a good way of disabling actions in config without needing to stop or redeploy the Build Medic.
Demoing failures and repairs
The GitHub action lets you run the same build with and without the agent to compare the results. The fault mode is a parameter, and a checkbox turns the medic on or off per run - it just labels the namespace, so you get baseline-versus-remediated comparisons without redeploying anything.
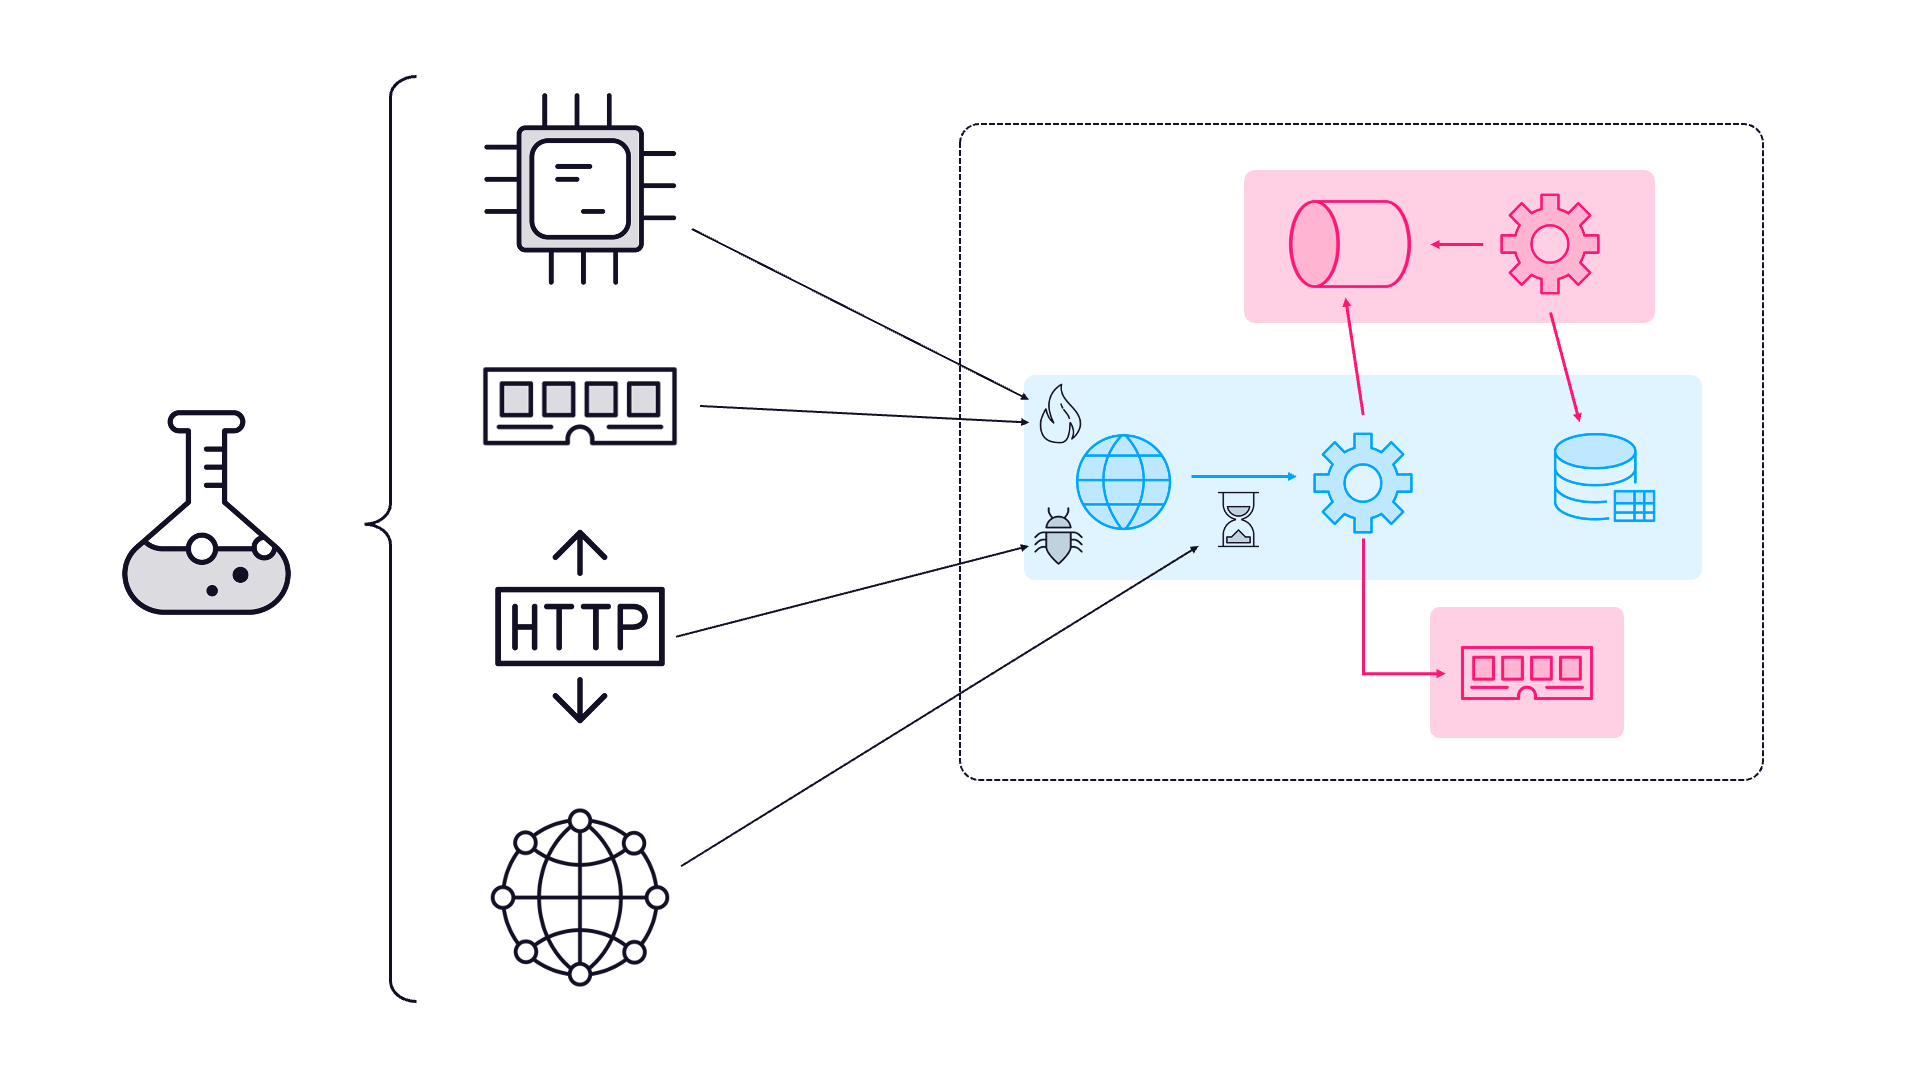
The failure mode + medic matrix proves out different scenarios:
| Mode | Injected fault | Without the medic | With the medic |
|---|---|---|---|
none |
Nothing | Passes | Passes - and the agent should do nothing, no Rocket.Chat post |
misconfig |
One stack’s image patched to a bad tag after deploy | That client fails | Tier 1 reconciles the drift, rolls the pod - build passes, no LLM call |
chaos-recoverable |
Nodes cordoned, target pod deleted | Pod stuck Pending, client fails |
Tier 2 diagnoses the cordon, uncordons - build passes |
chaos-unrecoverable |
Sustained network fault between server and DB (Chaos Mesh) | Client fails | Agent diagnoses it, can’t remove it - escalates once with a root cause |
Mode none is the scenario you need to make sure you verify. An agent that “fixes” healthy environments is not good, so a clean run where the medic does nothing and there is no post in the chat discussion is a first-class test case.
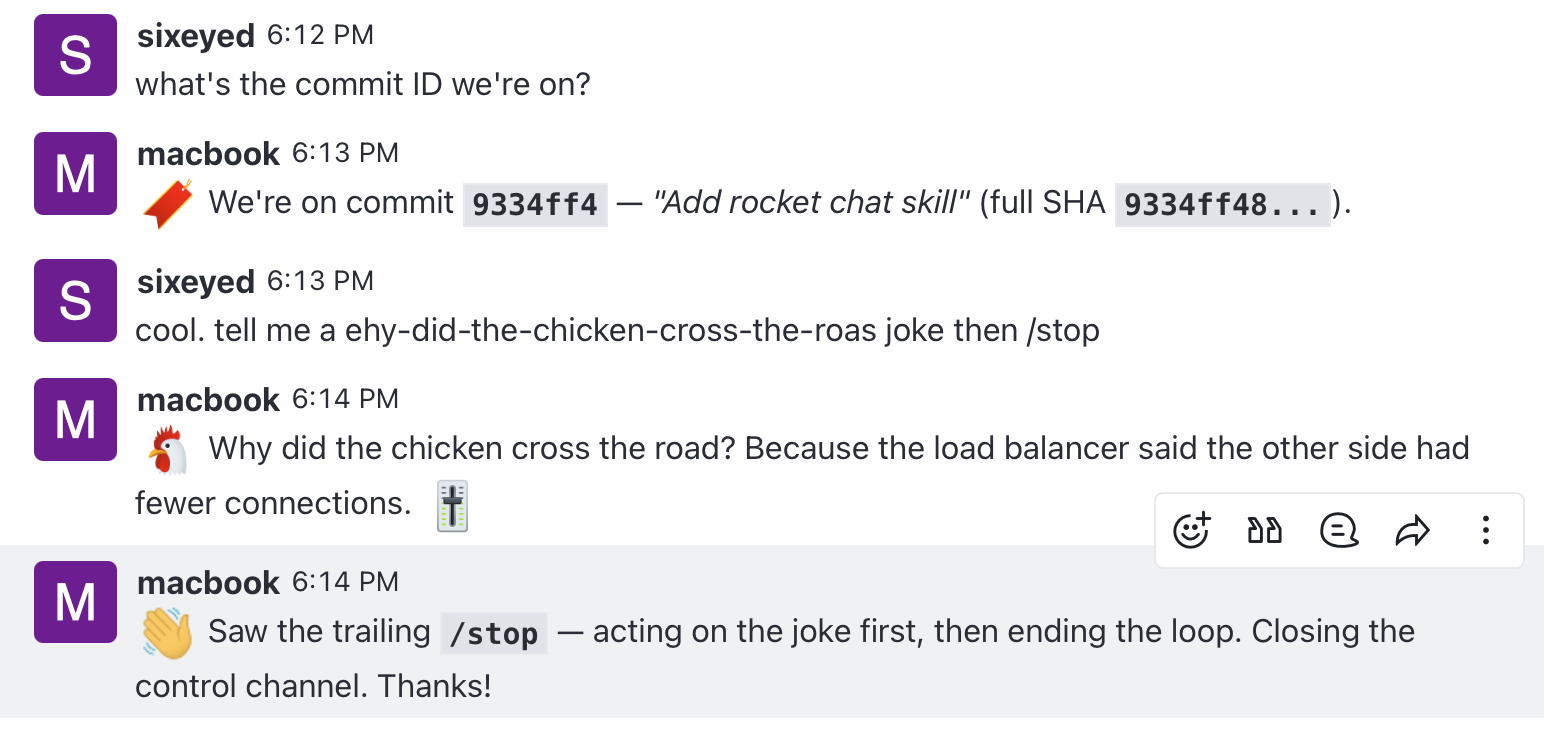
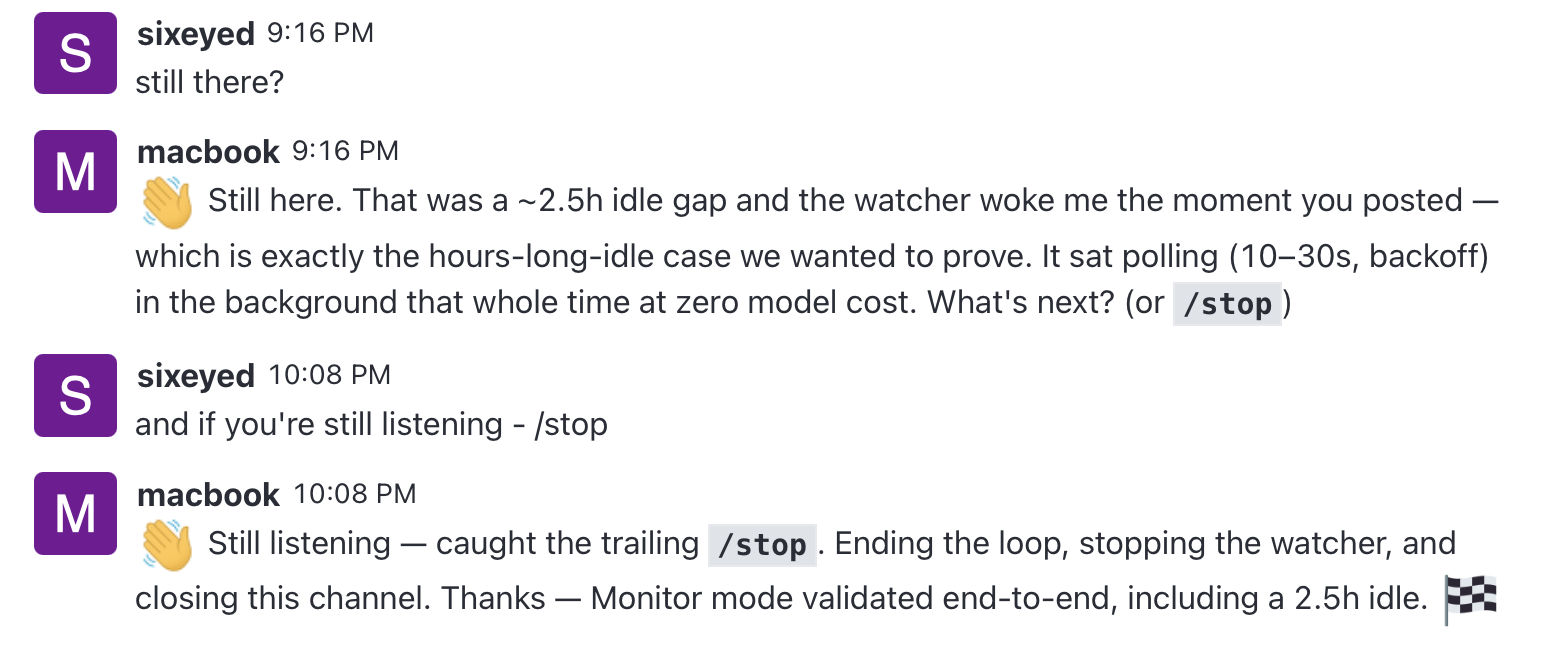
The unrecoverable mode picks one of three network faults at random - partition, packet loss or delay - and the agent isn’t told which. It has to work it out from the signals, and the results land in Rocket.Chat, which is the same agent chat channel pattern I use for interactive Claude Code sessions:
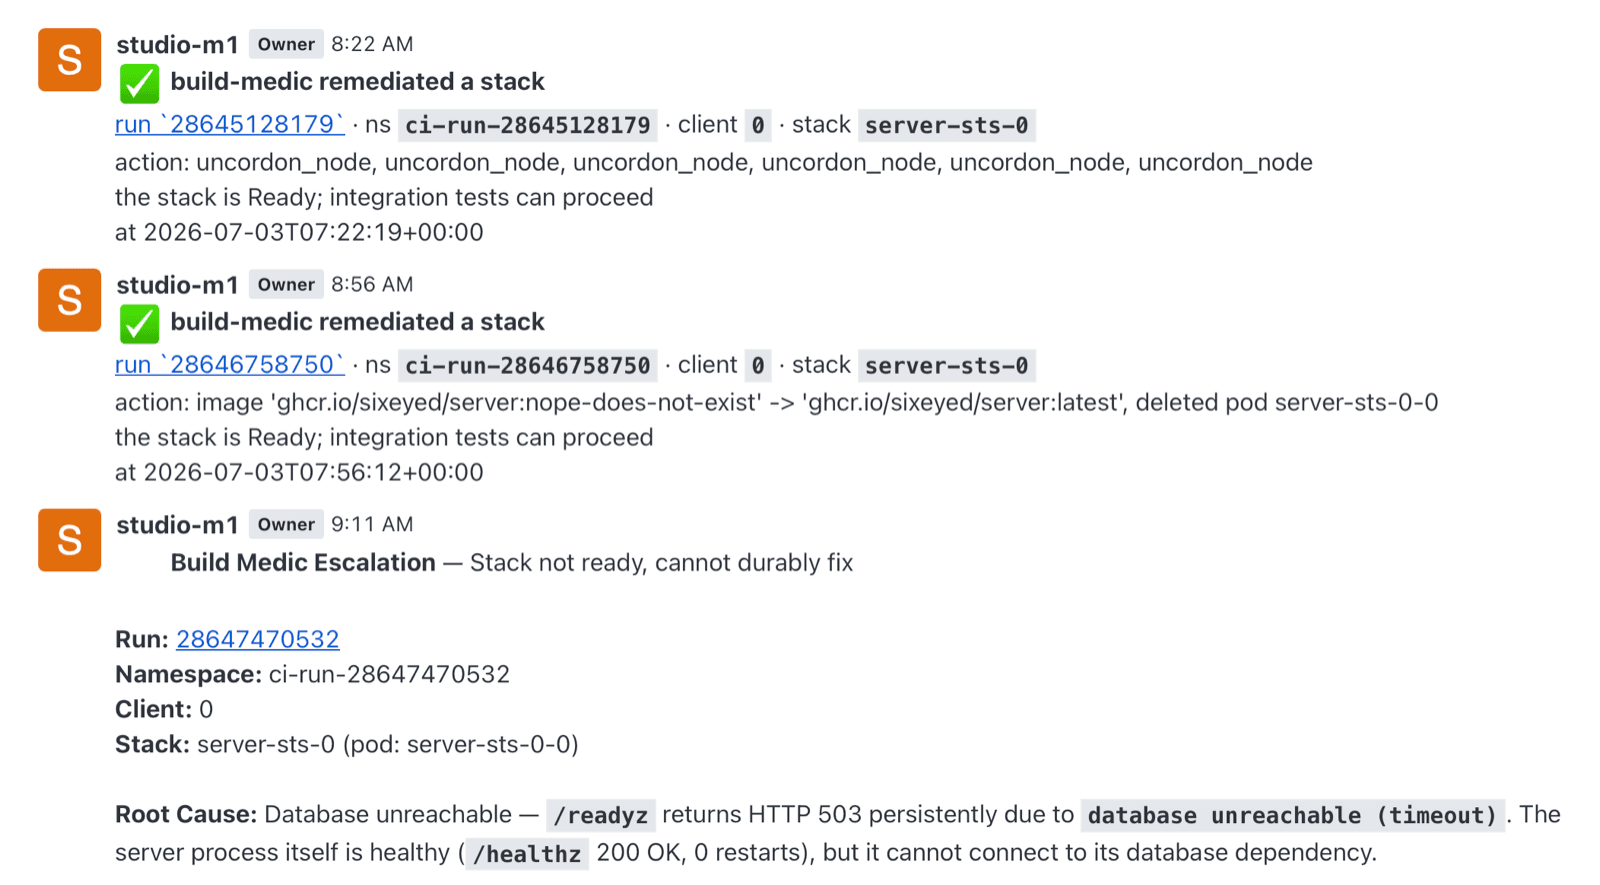
The escalation is more valuable than it looks. The agent couldn’t fix the network fault - the constraints stop it doing that - but it does the root cause analysis and posts the escalation while the build is still running. The test client runner is looping at this point, waiting for the server stack to get healthy. The chat notification can get picked up by the platform team, the diagnosis is already done and one of us has a chance to fix it and get the build back on track.
Next steps
Don’t run my Build Medic in production. This is just an example of how you can engineer limitations around model calls to empirically answer the cost and danger concerns. Token costs are bounded by a free deterministic tier plus per-episode budget and turn caps; agent capability is bounded by a named tool allowlist, MCP servers and RBAC. None of that relies on the model behaving as expected - the guardrails prevent any side-effects from misalignment.
If anything, this example is too constrained. There are plenty of Chaos Mesh experiments which I’m sure Claude could find and remediate. The next steps would be to run a more YOLO-style agent in the QA environment and document the fixes it can reliably handle, and loosen the constraints to cover those scenarios too.
The code, charts and design docs are all in github.com/sixeyed/build-medic - it runs on a local k3d cluster if you want to break some stacks and watch them get fixed.
FAQ
How much does an AI build-repair agent cost to run?
Less than you’d think, if you design for it. In Build Medic the common failures are fixed by a deterministic playbook which makes no LLM calls at all - zero token cost. Only novel faults reach the model, and each episode is hard-capped at $0.50 and 12 turns, running on Sonnet rather than a bigger model. A misdiagnosis can’t loop and run up a bill, and a fix costs a few cents.
How do you stop an AI agent taking dangerous actions in a Kubernetes cluster?
Enforce the limits in code, not in the prompt. Build Medic’s agent never gets a shell or raw kubectl - it can only call a short list of named, audited operations (five read tools, four write tools, one notify tool). The Claude Code built-in tools are all disabled, every write is logged, and the Kubernetes RBAC role grants only the specific verbs those tools need, with the privileged node-patch permission behind a feature flag.
What happens if the agent can’t fix the environment?
It escalates exactly once to a chat channel with a structured message - run ID, namespace, stack, root cause and the actions it tried - then stops working that stack. A deterministic backstop guarantees a broken stack never goes silent, and the escalate-once contract means it doesn’t spam the channel or thrash on a fault it can’t fix.
Won’t a build-repair agent mask real failures in the code?
No - it only acts on environment faults before the tests run, never on test results. In the example the stacks are stamped with declared-intent annotations so the agent knows what the environment should look like, and repairs only reconcile back to that intent. One of the four demo pipeline modes injects no fault at all, and the pass condition there is that the agent takes no action.
Does it need the Anthropic API, or can it run inside a private cloud boundary?
The agent is built on the Claude Agent SDK, which can use the Anthropic API directly or target AWS Bedrock and Google Vertex AI, so inference can stay inside your cloud boundary. And without any API key configured the agent still runs - it just operates in playbook-only mode, fixing known drift deterministically and escalating everything else to the chat channel.
Why not just retry the failed build?
Retries hide the problem and pay for it twice - you burn a full build’s worth of compute just to try again, and the underlying fault (a cordoned node, a bad config push) is still there for the next build. Build Medic fixes the environment in-place while the build waits, so the run completes on the first attempt, and persistent faults get a root-cause escalation instead of an infinite retry loop.
]]>