Windows Weekly Dockerfile #19: Integrating UI Containers
There are 52 Dockerfiles in the source code for my book, Docker on Windows. Perfect for a year-long blog series.
Each week (!) I’ll look at one Dockerfile in detail, showing you what it does and how it works. This is #19 in the series, where I’ll look at integrating UI features running across multiple containers.
Managing Deconstructed UIs - the Easy Way
In the last instalment I talked about breaking monolithic UIs out into separate containers, and all the advantages that gives you. It’s a great approach, but it leaves you with the problem of how you integrate the components, so users hit a single URL and traffic gets directed to the right container.
The correct way to do it is with a reverse proxy, which becomes the public entrypoint to your app. The proxy receives all incoming traffic, and routes it to the correct container:
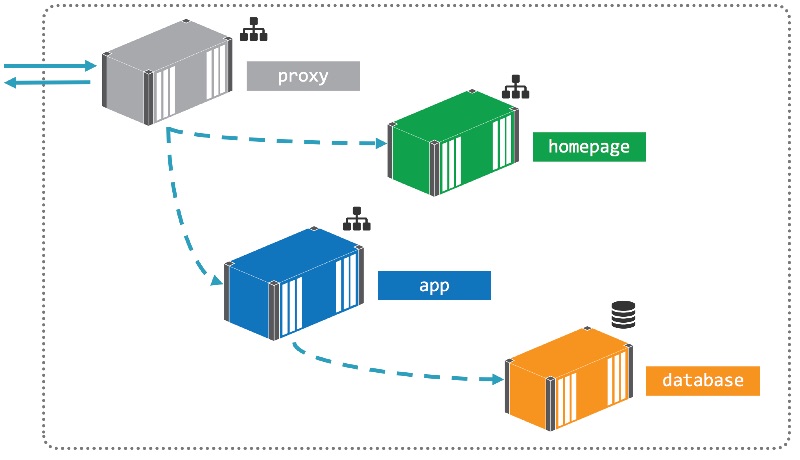
You can use the excellent Nginx for the reverse proxy, especially useful if you’re running on a hybrid Windows and Linux swarm. Or use IIS with URL rewrites
But that could be a step too far if you just want to see what this approach looks like for your app. So the simple version is to keep your existing monolith as the entrypoint to the app, and internally consume the new UI component from the existing app:
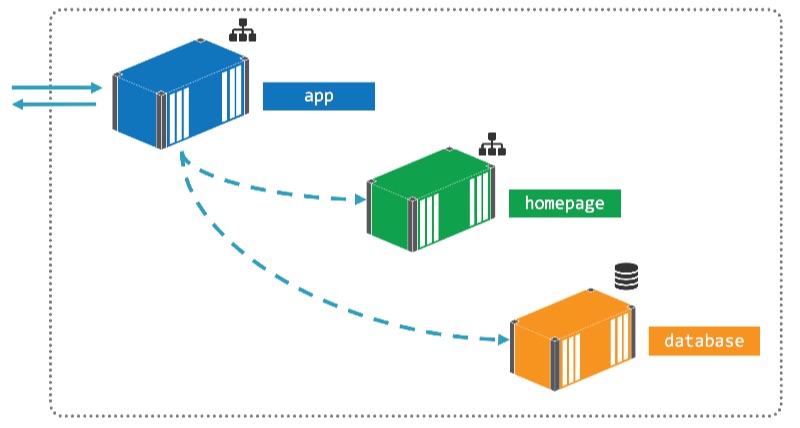
That’s the approach I take this week, consuming the new Nerd Dinner homepage from the existing ASP.NET app.
The Dockerfile
This week’s Dockerfile is another multi-stage build example, where the first stage compiles the ASP.NET app from source and the second stage packages the compiled app into the Docker image.
I’m using a custom image for the build stage, which has the .NET toolchain installed - including MSBuild, NuGet, Web Deploy and the VS web targets.
Microsoft now have their own .NET Framework build images - see Dockerizing .NET Apps with Microsoft’s Build Images on Docker Hub. But there isn’t one for ASP.NET apps yet.
The builder stage is pretty simple, just doing a NuGet restore and then building the web project:
WORKDIR C:\src\NerdDinner
COPY src\NerdDinner\packages.config .
RUN nuget restore packages.config -PackagesDirectory ..\packages

COPY src C:\src
RUN msbuild NerdDinner.csproj /p:OutputPath=c:\out\NerdDinner `
        /p:DeployOnBuild=true /p:VSToolsPath=C:\MSBuild.Microsoft.VisualStudio.Web.targets.14.0.0.3\tools\VSToolsPath
Those properties contain paths to the toolchain. It’s a bit ugly to see in the Dockerfile, and there’s actually a neater approach I’ve used for my recent YouTube series on modernizing .NET apps with Docker - see the builder Dockerfile and the web app Dockerfile.
Back to this week though. In the final stage of the Dockerfile the app gets configured with a couple of environment variables:
ENV SA_PASSWORD="N3rdD!Nne720^6" `
    HOMEPAGE_URL="http://nerd-dinner-homepage"
If you look closely you’ll see a SQL Server administrator password there in plaintext :) Docker secrets are a much better option.
The second environment variable is the URL where the app should read the homepage content. This setup expects the homepage app to be running in a container called nerd-dinner-homepage, which the app container will find with Docker’s service discovery.
The URL in that variable is used in the HomeController class which reads and stores the HTML content from the remote location (which happens to be another container):
  var homepageUrl = Environment.GetEnvironmentVariable("HOMEPAGE_URL", EnvironmentVariableTarget.Machine);
  var request = WebRequest.Create(homepageUrl);
  using (var response = request.GetResponse())
  using (var responseStream = new StreamReader(response.GetResponseStream()))
  {
    _NewHomePageHtml = responseStream.ReadToEnd();
  }
Yes you should be using IDisposable correctly, like in this example.
And then the Index route gets rendered by returning the content of that HTML instead of the actual view in the MVC app:
public string Index()
{
  return _NewHomePageHtml;
}
It’s a basic approach, but it gets you the core benefits - a separate container for the homepage UI, which can be scaled, deployed and upgraded in isolation of the rest of the app.
Usage
Build the Docker image in the usual way - cloning the GitHub repo, switching to the right directory and building the image. In the book I use the same image name with a v2 version number in the tag:
git clone https://github.com/sixeyed/docker-on-windows.git

cd docker-on-windows/ch03/ch03-nerd-dinner-web

docker image build -t dockeronwindows/ch03-nerd-dinner-web:v2 .
You don’t need to build the image yourself, you can just run containers using the commands below and Docker will pull the public images from Docker Hub.
Nerd Dinner now runs across three containers - the database, the original app, and the new homepage. I don’t get to Docker Compose until Chapter 6, so until then you need to run the containers in the correct order:
md C:\databases\nd

docker container run -d -p 1433:1433 `
  --name nerd-dinner-db `
  -v C:\databases\nd:C:\data
  dockeronwindows/ch03-nerd-dinner-db

docker container run -d -P `
  --name nerd-dinner-homepage `
  dockeronwindows/ch03-nerd-dinner-homepage

docker container run -d -P `
  --name nerd-dinner `
  dockeronwindows/ch03-nerd-dinner-web:v2
The
--nameoptions for the containers are important - the container name is how containers access each other using the DNS server built into Docker. The names in theruncommands match the defaults expected in the app.
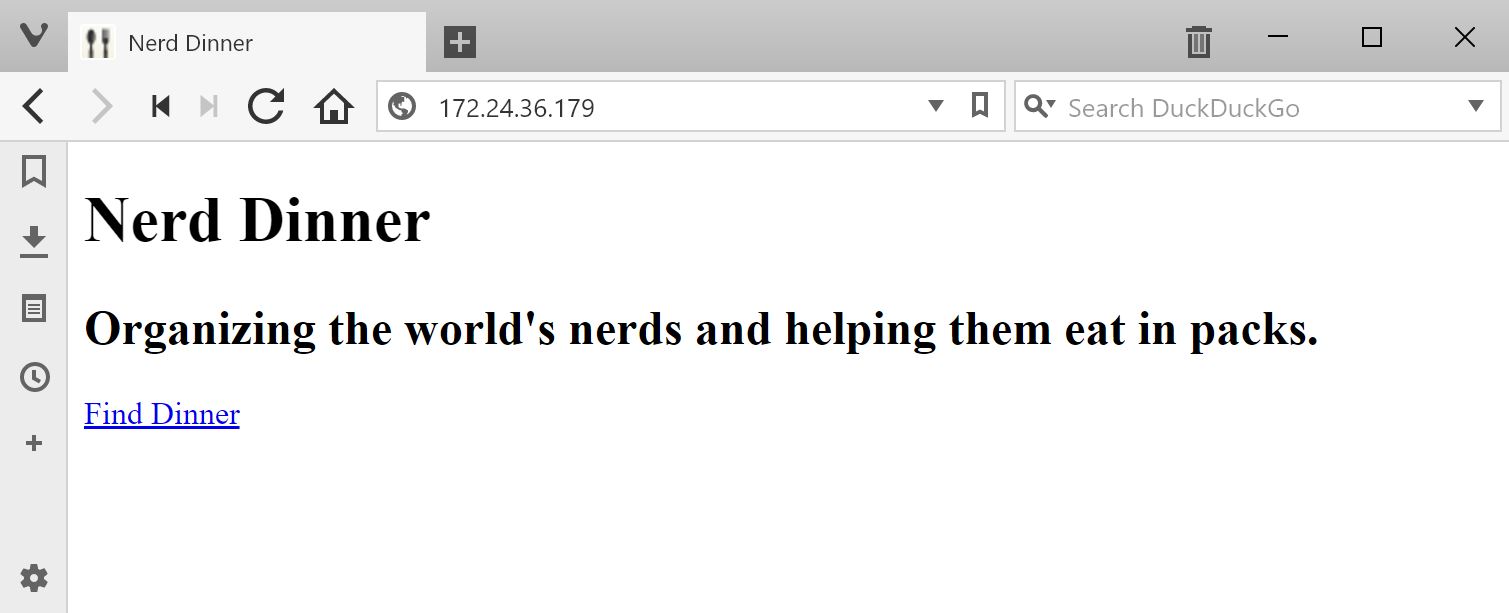
When the containers are all running, you can get the IP address of the Nerd Dinner container and browse to it (or just use localhost if you have a recent version of Docker for Windows):
Which is almost the desired result.
The new UI is coming from the homepage container, but it doesn’t have the same fancy UI we saw last week. That’s because of this simple integration approach. The original app just gets the raw HTML from the homepage container - not the extra content like CSS and scripts.
As a POC we’re done here. To carry on with this approach you’d need to make sure the main application container packages all the content the other UI containers expect to render.
But really you should look into the reverse proxy option, which I cover in Modernizing .NET Apps with Docker
Next Up
That’s the end of Chapter 3! Chapter 4 is all about registries - understanding how to tag images, login to registries and push and pull images from repositories.
There’s only one Dockerfile in Chapter 4, which packages up the open-source Docker registry server. I’ll cover that next week and show you how to run your own local registry server in a container.

Comments