You can’t always have Kubernetes: running containers in Azure VM Scale Sets
Rule number 1 for running containers in production: don’t run them on individual Docker servers. You want reliability, scale and automated upgrades and for that you need an orchestrator like Kubernetes, or a managed container platform like Azure Container Instances.
If you’re choosing between container platforms, my new Pluralsight course Deploying Containerized Applications walks you through the major options.
But the thing about production is: you’ve got to get your system running, and real systems have technical constraints. Those constraints might mean you have to forget the rules. This post covers a client project I worked on where my design had to forsake rule number 1, and build a scalable and reliable system based on containers running on VMs.
This post is a mixture of architecture diagrams and scripts - just like the client engagement.
When Kubernetes won’t do
I was brought in to design the production deployment, and build out the DevOps pipeline. The system was for provisioning bots which join online meetings. The client had run a successful prototype with a single bot running on a VM in Azure.
The goal was to scale the solution to run multiple bots, with each bot running in a Docker container. In production the system would need to scale quickly, spinning up more containers to join meetings on demand - and more hosts to provide capacity for more containers.
So far, so Kubernetes. Each bot needs to be individually addressable, and the connection from the bot to the meeting server uses mutual TLS. The bot has two communication channels - HTTPS for a REST API, and a direct TCP connection for the data stream from the meeting. That can all be done with Kubernetes - Services with custom ports for each bot, Secrets for the TLS certs, and a public IP address for each node.
If you want to learn how to model an app like that, my book Learn Kubernetes in a Month of Lunches is just the thing for you :)
But… The bot uses a Windows-only library to connect to the meeting, and the bot workload involves a lot of video manipulation. So that brought in the technical constraints for the containers:
- they need to run with GPU access
- the app uses the Windows video subsystem, and that needs the full (big!) Windows base Docker image.
Right now you can run GPU workloads in Kubernetes, but only in Linux Pods, and you can run containers with GPUs in in Azure Container Instances, but only for Linux containers. So we’re looking at a valid scenario where orchestration and managed container services won’t do.
The alternative - Docker containers on Windows VMs in Azure
You can run Docker containers with GPU access on Windows with the devices flag. You need to have your GPU drivers set up and configured, and then your containers will have GPU access (the DirectX Container Sample walks through it all):
# on Windows 10 20H2:
docker run --isolation process --device class/5B45201D-F2F2-4F3B-85BB-30FF1F953599 sixeyed/winml-runner:20H2

# on Windows Server LTSC 2019:
docker run --isolation process --device class/5B45201D-F2F2-4F3B-85BB-30FF1F953599 sixeyed/winml-runner:1809
The container also needs to be running with process isolation - see my container show ECS-W4: Isolation and Versioning in Windows Containers on YouTube for more details on that.
Note - we’re talking about the standard Docker Engine here. GPU access for containers used to require an Nvidia fork of Docker, but now GPU access is part of the main Docker runtime.
You can spin up Windows VMs with GPUs in Azure, and have Docker already installed using the Windows Server 2019 Datacenter with Containers VM image. And for the scaling requirements, there are Virtual Machine Scale Sets (VMSS), which let you run multiple instances of the same VM image - where each instance can run multiple containers.
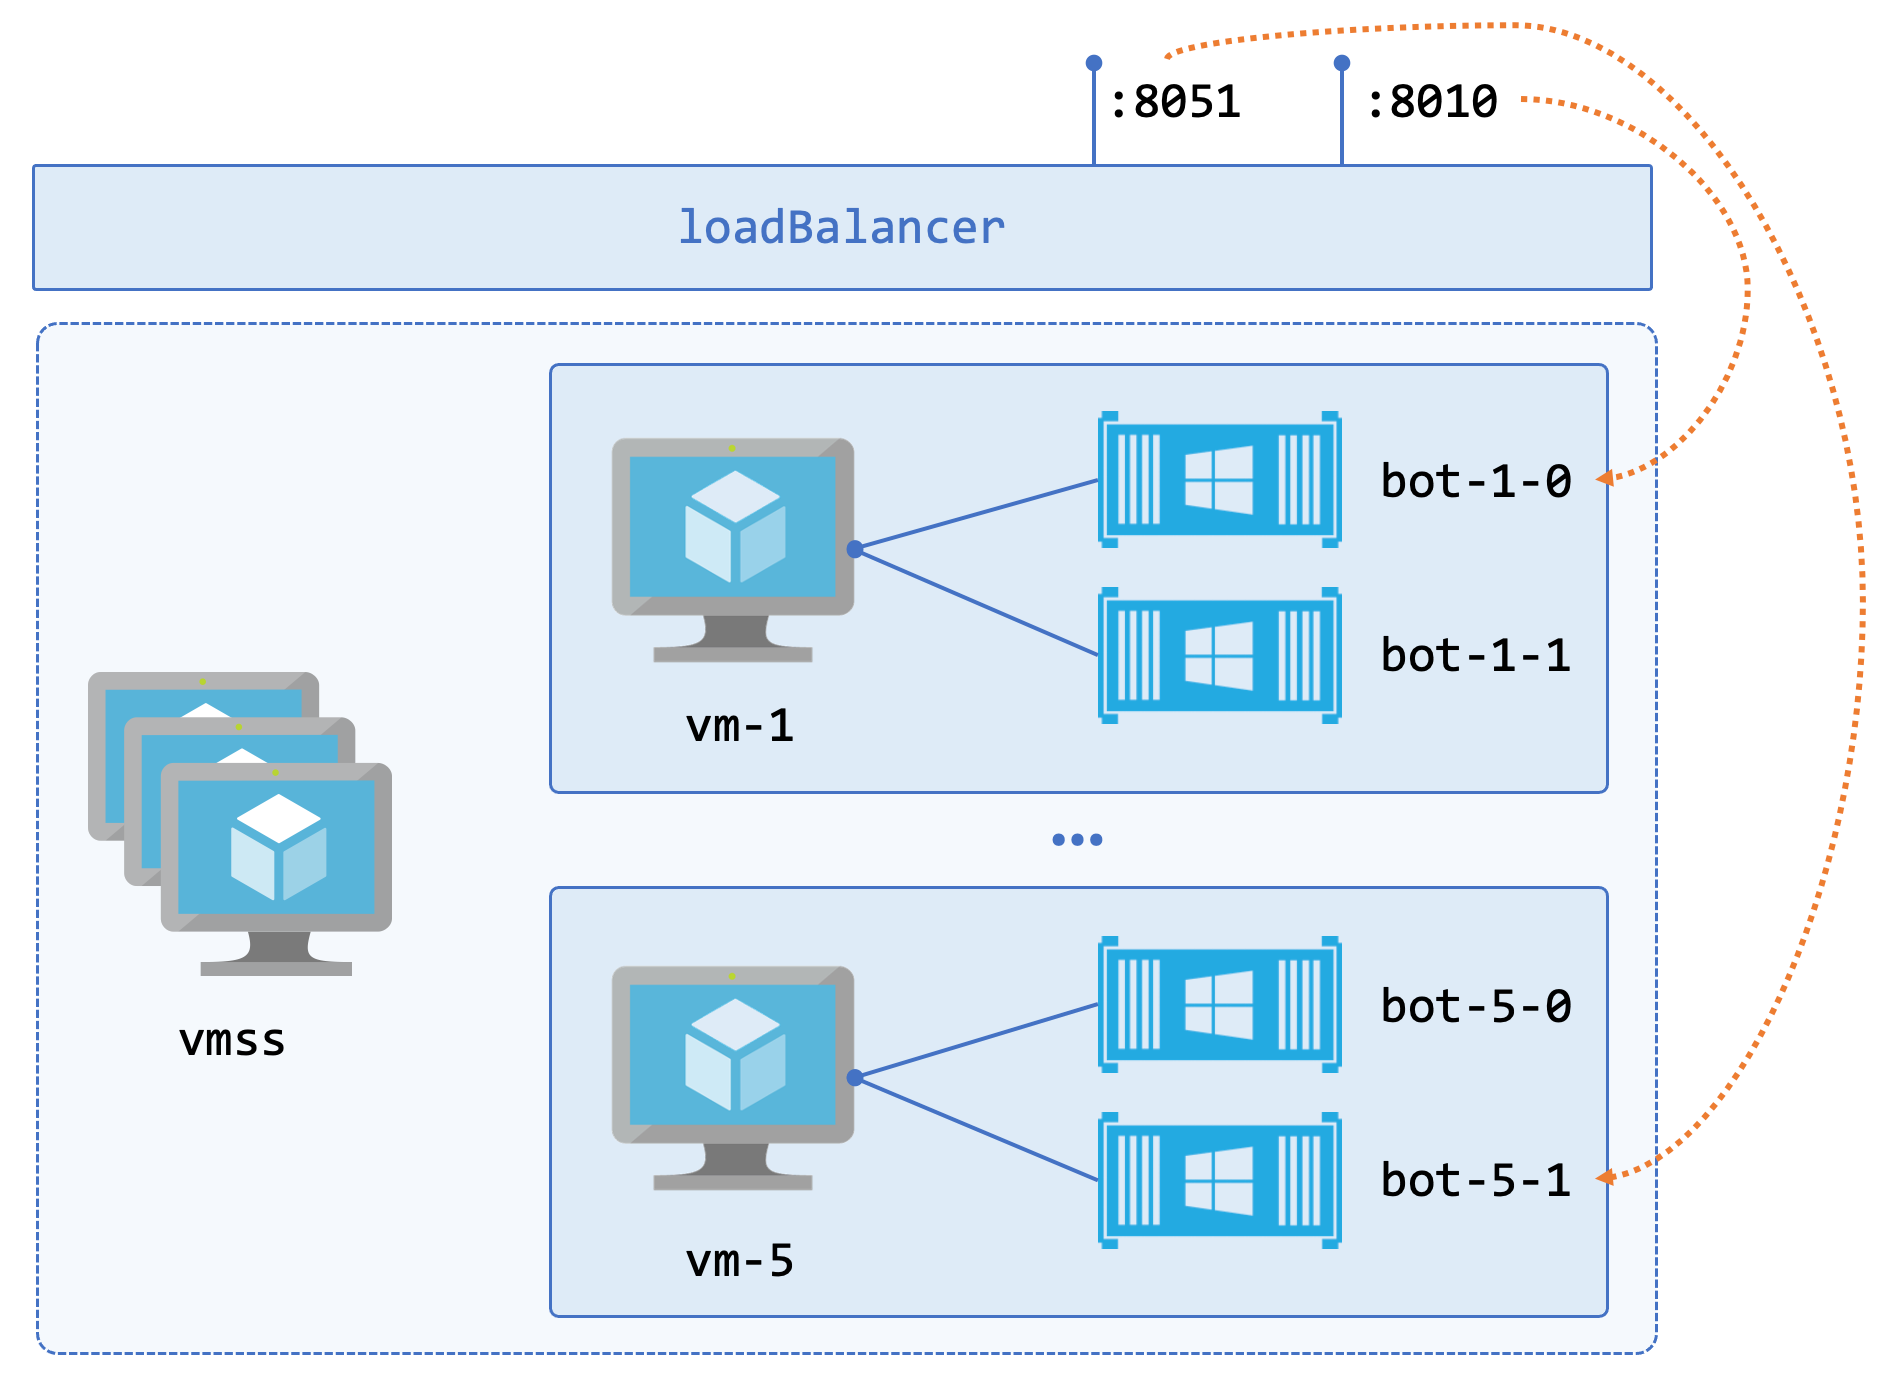
The design I sketched out looked like this:

- each VM hosts multiple containers, each using custom ports
- a load balancer spans all the VMs in the scale set
- load balancer rules are configured for each bot’s ports
The idea is to run a minimum number of VMs, providing a stable pool of bot containers. Then we can scale up and add more VMs running more containers as required. Each bot is uniquely addressable within the pool, with a predictable address range, so bots.sixeyed.com:8031 would reach the first container on the third VM and bots.sixeyed.com:8084 would reach the fourth container on the eighth VM.
Using a custom VM image
With this approach the VM is the unit of scale. My assumption was that adding a new VM to provide more bot capacity would take several minutes - too long for a client waiting for a bot to join. So the plan was to run with spare capacity in the bot pool, scaling up the VMSS when the pool of free bots fell below a threshold.
Even so, scaling up to add a new VM had to be a quick operation - not waiting minutes to pull the super-sized Windows base image and extract all the layers. The first step in minmizing scale-up time is to use a custom VM image for the scale set.
A VMSS base image can be set up manually by running a VM and doing whatever you need to do. In this case I could use the Windows Server 2019 image with Docker configured, and then run an Azure extension to install the Nvidia GPU drivers:
# create vm:
az vm create `
  --resource-group $rg `
  --name $vmName `
  --image 'MicrosoftWindowsServer:WindowsServer:2019-Datacenter-Core-with-Containers' `
  --size 'Standard_NC6_Promo' `
  --admin-username $username `
  --admin-password $password

# deploy the nvidia drivers:
az vm extension set `
  --resource-group $rg `
  --vm-name $vmName `
  --name NvidiaGpuDriverWindows `
  --publisher Microsoft.HpcCompute `
  --version 1.3
The additional setup for this particular VM:
- pre-pulling the Windows base image
- configuring the Nvidia GPU to use the correct driver mode for video decoding - MDDM instead of TCC
- installing the Azure CLI so the VM can authenticate to a private Azure Container Registry to pull application images
- running SysPrep to generalize the Windows OS
Then you can create a private base image from the VM, first deallocating and generalizing it:
az vm deallocate --resource-group $rg --name $vmName

az vm generalize --resource-group $rg --name $vmName

az image create --resource-group $rg `
    --name $imageName --source $vmName
The image can be in its own Resource Group - you can use it for VMSSs in other Resources Groups.
Creating the VM Scale Set
Scripting all the setup with the Azure CLI makes for a nice repeatable process - which you can easily put into a GitHub workflow. The az documentation is excellent and you can build up pretty much any Azure solution using just the CLI.
There are a few nice features you can use with VMSS that simplify the rest of the deployment. This abridged command shows the main details:
az vmss create `
   --image $imageId `
   --subnet $subnetId `
   --public-ip-per-vm `
   --public-ip-address-dns-name $vmssPipDomainName `
   --assign-identity `
  ...
That’s going to use my custom base image, and attach the VMs in the scale set to a specific virtual network subnet - so they can connect to other components in the client’s backend. Each VM will get its own public IP address, and a custom DNS name will be applied to the public IP address for the load balancer across the set.
The VMs will use managed identity - so they can securely use other Azure resources without passing credentials around. You can use az role assignment create to grant access for the VMSS managed identity to ACR.
When the VMSS is created, you can set up the rules for the load balancer, directing the traffic for each port to a specific bot container. This is what makes each container individually addressable - only one container in the VMSS will listen on a specific port. A health probe in the LB tests for a TCP connection on the port, so only the VM which is running that container will pass the probe and be sent traffic.
# health probe:
az network lb probe create `
 --resource-group $rg --lb-name $lbName `
 -n "p$port" --protocol tcp --port $port

# LB rule:
az network lb rule create `
 --resource-group $rgName --lb-name $lbName `
 --frontend-ip-name loadBalancerFrontEnd `
 --backend-pool-name $backendPoolName `
 --probe-name "p$port" -n "p$port" --protocol Tcp `
 --frontend-port $port --backend-port $port
Spinning up containers on VMSS instances
You can use the Azure VM custom script extension to run a script on a VM, and you can trigger that on all the instances in a VMSS. This is the deployment and upgrade process for the bot containers - run a script which pulls the app image and starts the containers.
Up until now the solution is pretty solid. This script is the ugly part, because we’re going to manually spin up the containers using docker run:
docker container run -d `
 -p "$($port):443" `
 --restart always `
 --device class/5B45201D-F2F2-4F3B-85BB-30FF1F953599 `
 $imageName
The real script adds an env-file for config settings, and the run commands are in a loop so we can dynamically set the number of containers to run on each VM. So what’s wrong with this? Nothing is managing the containers. The restart flag means Docker will restart the container if the app crashes, and start the containers if the VM restarts, but that’s all the additional reliability we’ll get.
In the client’s solution, they added functionality to their backend API to manage the containers - but that sounds a lot like writing a custom orchestrator…
Moving on from the script, upgrading the VMSS instances is simple to do. The script and any additional assets - env files and certs - can be uploaded to private blob storage, using SAS tokens for the VM to download. You use JSON configuration for the script extension and you can split out sensitive settings.
# set the script on the VMSS:
az vmss extension set `
    --publisher Microsoft.Compute `
    --version 1.10 `
    --name CustomScriptExtension `
    --resource-group $rg `
    --vmss-name $vmss `
    --settings $settings.Replace('"','\"') `
    --protected-settings $protectedSettings.Replace('"','\"')

# updating all instances triggers the script:
az vmss update-instances `
 --instance-ids * `
 --name $vmss `
 --resource-group $rg
When you apply the custom script extension that updates the model for the VMSS - but it doesn’t actually run the script. The next step does that, updating instances runs the script on each of them, replacing the containers with the new Docker image version.
Code and infra workflows
All the Azure scripts can live in a separate GitHub repo, with secrets added for the az authentication, cert passwords and everything else. The upgrade scripts to deploy the custom script extension and update the VMSS instances can sit in a workflow with a workflow_dispatch trigger and input parameters:
on:
  workflow_dispatch:
    inputs:
      environment:
        description: 'Environment to deploy: dev, test or prod'
        required: true
        default: 'dev'
      imageTag:
        description: 'Image tag to deploy, e.g. v1.0-175'
        required: true
        default: 'v1.0'
The Dockerfile for the image lives in the source code repo with the rest of the bot code. The workflow in that repo build and pushes the image and ends by triggering the upgrade deployment in the infra repo - using Ben Coleman’s benc-uk/workflow-dispatch action:
deploy-dev:
  if: $
  runs-on: ubuntu-18.04
  needs: build-teams-bot
    steps:
    - name: Dispatch upgrade workflow
      uses: benc-uk/workflow-dispatch@v1
      with:
        workflow: Upgrade bot containers
        repo: org/infra-repo
        token: $
        inputs: '{"environment":"dev", "imageTag":"v1.0-$"}'
        ref: master
So the final pipeline looks like this:
- devs push to the main codebase
- build workflow triggered - uses Docker to compile the code and package the image
- if the build is successful, that triggers the publish workflow in the infrastructure repo
- the publish workflow updates the VM script to use the new image label, and deploys it to the Azure VMSS.
I covered GitHub workflows with Docker in ECS-C2: Continuous Deployment with Docker and GitHub on YouTube
Neat and automated for a reliable and scalable deployment. Just don’t tell anyone we’re running containers on individual servers, instead of using an orchestrator…
Want to learn more about container orchestration? Check out my guide on Getting Started with Kubernetes on Windows or explore my Docker and Kubernetes learning path.

Comments