Weekly Windows Dockerfile #4
There are 52 Dockerfiles in the source code for my book, Docker on Windows. Perfect for a year-long blog series.
Each week (excepting holidays :) I’ll look at one Dockerfile in detail, showing you what it does and how it works. This is #4 in the series.
ch02-dotnet-helloworld
In Chapter 2 I look at ways of packaging your own applications in Docker, starting with a very simple .NET Core Hello World app.
The app is just a console app with a Program.cs that writes a single line of output:
class Program
{
  static void Main(string[] args)
  {
    Console.WriteLine("Hello World!");
  }
}
.NET Core apps needs to be compiled before they can be run. There are three ways you can package an app from source in Docker:
use a base image which has the SDK and the runtime for your application installed, copy the source code into the image and compile the app as part of building the image;
use a base image which has just the runtime for your app installed, compile the app from source outside of Docker, using the SDK on your local machine, then just copy the compiled binaries into the image;
use Docker multi-stage builds to combine the previous approaches - compiling the app in one stage, using a base image that has the SDK installed, then packaging the binaries in a subsequent stage that just has the runtime installed.
This week’s Dockerfile for ch02-dotnet-helloworld uses the first option. It has the advantage of being simple to use and it doesn’t require .NET Core on the host to build or run the image.
Option 1 doesn’t produce a minimal Docker image. The final image for the application also contains the .NET Core SDK, which you isn’t necessar to run the app, so the other options are preferable - but this is good for an introduction.
The Dockerfile
.NET Core is a cross-platform runtime, but Docker on Windows is all about Docker containers on Windows, so I use an image based on Microsoft Nano Server for the Dockerfile:
FROM microsoft/dotnet:1.1-sdk-nanoserver

WORKDIR /src
COPY src/ .

RUN dotnet restore; dotnet build
CMD ["dotnet", "run"]
the FROM image is a variant of microsoft/dotnet. It has .NET Core version 1.1 installed, with the runtime and the SDK, and it’s based on Nano Server so it’s a Windows Docker image.
WORKDIR creates the C:\src directory on the image and then sets that as the current working directory in the image. COPY copies the contents of the local src directory into the image. In the source tree, the src directory is in the same path as the Dockerfile.
the RUN instruction executes dotnet restore to restore dependencies for the app. The project file doesn’t need to be specified, because there’s a single csproj file in the directory. dotnet build compiles the application, so at the end of the RUN instruction, the Docker image has everything it needs to run the .NET Core app.
the CMD instruction specifies the starting point when you run a Docker container from the image - dotnet run, which just runs the console app, which is already compiled in the image.
Usage
You can build and run this app without having any version of .NET Core installed, you just need Docker for Windows running on Windows 10 or Windows Server 2016.
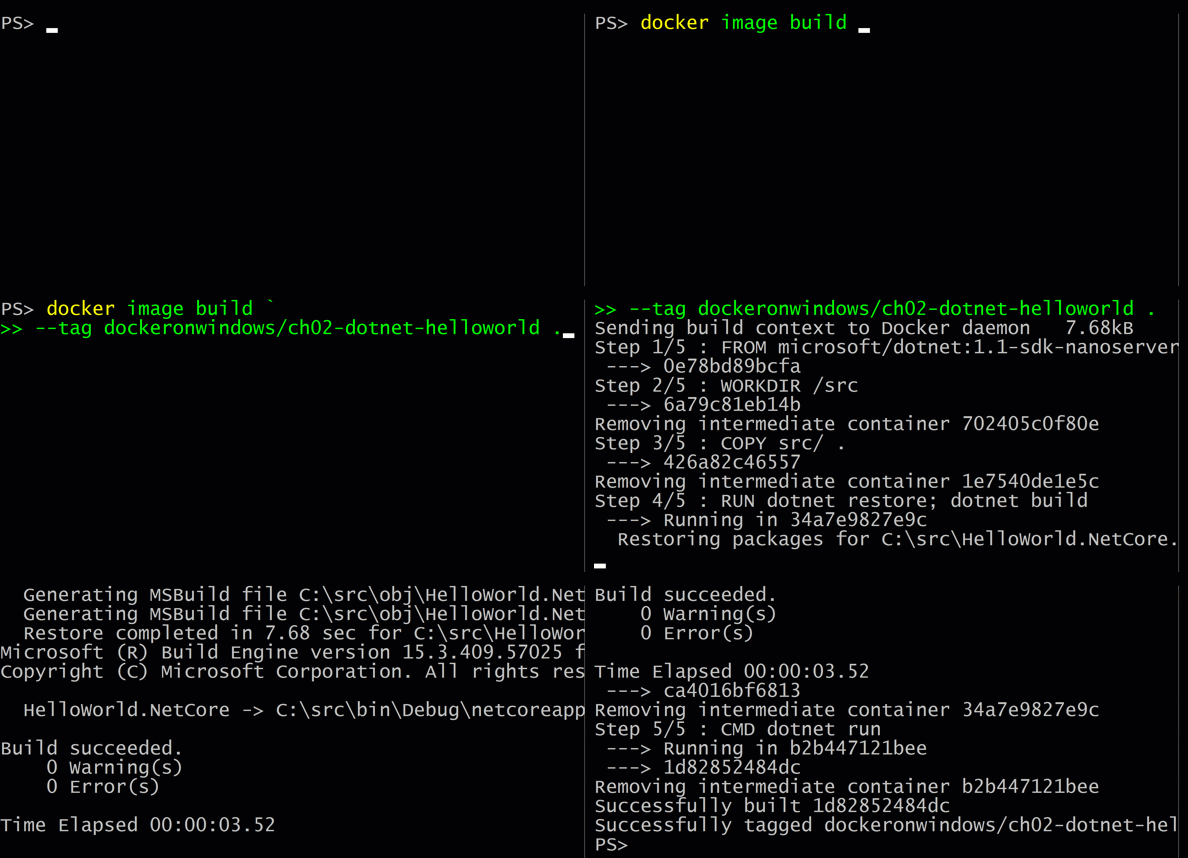
Clone the source from GitHub, and from the ch02-dotnet-helloworld directory, run docker image build to compile the app and package it into a Docker image. You’ll see the output from NuGet and MSBuild as the app gets compiled during the image build:
Then run the app using docker container run:

The application is built on version 1.1 of .NET Core, but you don’t need that version installed locally to run the app. The FROM image is pinned to a version of Microsoft’s .NET Core image that has the 1.1 runtime and SDK installed, so it will always have the correct dependencies.
This is a simple way to package a .NET Core app in a Windows Docker image, but it’s not optimal. The final application image has the full .NET Core SDK installed, and a copy of all the source code for the app - which makes for a bigger image with a larger attack surface area. I’ll explore better options over the next couple of weeks.
Next Up
Chapter 2 uses the same source code to show the different packaging approaches in Docker. Next week I’ll look at the Dockerfile.slim variant, which packages the app without including the SDK in the final image.

Comments