
Build a Lightweight Dev Rig for Running Windows Docker Containers
You can only run Docker containers natively on Windows Server 2016. Windows 10 lets you run containers with elevated isolation in Hyper-V mode, but there are some restrictions around that - and you need to be on the fast insider track to get the latest bits. That isn’t a great idea on your everyday dev machine. Instead you can take advantage of the client-server nature of Docker to run containers in a headless Windows Server VM on your dev box.
The Docker engine runs as a Windows service on the host, and it exposes an API which the docker command line connects to. The command line is cross-platform, so you can manage the Docker engine on a Windows Server 2016 VM from any version of Windows, Linux or OS/X:
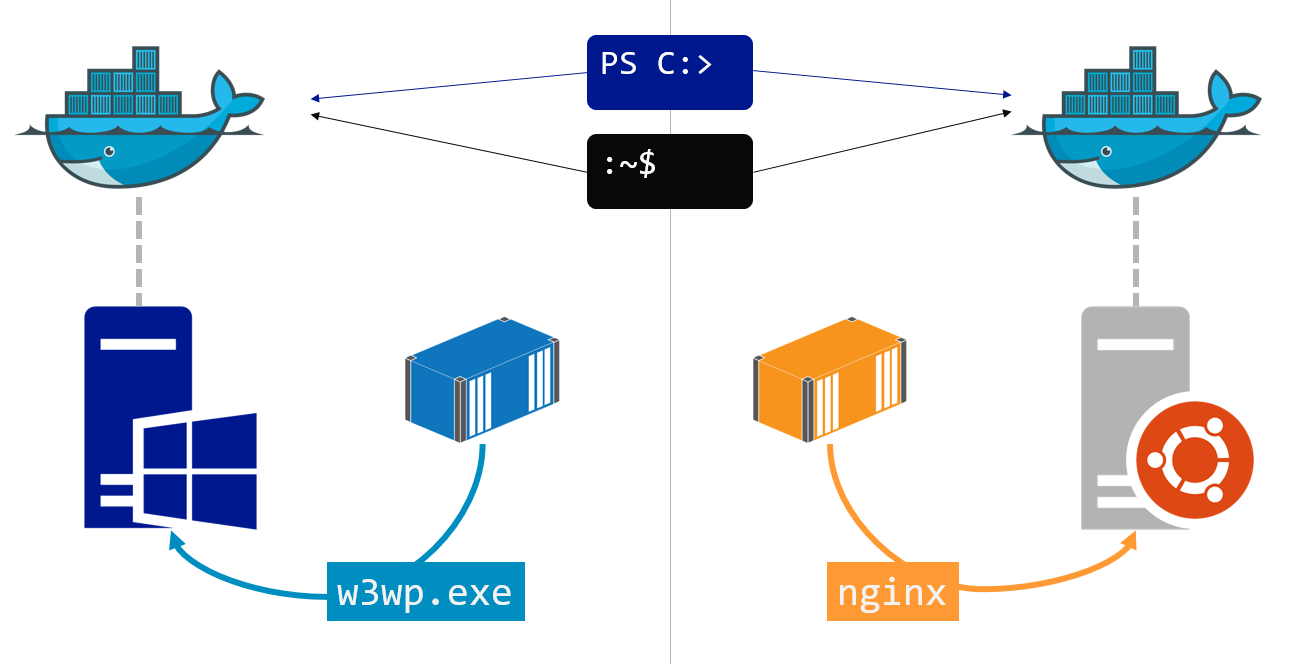
After trying many options, this is how I build my dev rigs now, and it’s the most flexible and efficient way I’ve found. Here’s how to do it.
Build a Slimline Windows Server 2016 VM
Once you’ve set up the Windows Server VM you won’t be connecting to it directly, you’ll treat it as a headless unit which you only interact with through the Docker CLI. So the best install option is Windows Server Core - not the Desktop Experience variant, because you don’t need the UI. Core gives you a lightweight VM that fills around 10GB of disk at baseline.
Start by installing Windows Server 2016. If you don’t have a licence, you can use the trial edition. The VM is throwaway - all your dev tools and content will be on the host machine, the VM is only there to run Docker. The setup is mostly scripted, so you can build a new VM when the trial expires without a big investment in effort.
Don’t install the VM additions for your platform on the Windows Server VM. The additional functionality is for graphics, audio, USB etc. which you don’t need. Keeping them off the VM makes it more portable - so you could move from VirtualBox to VMWare to Hyper-V.
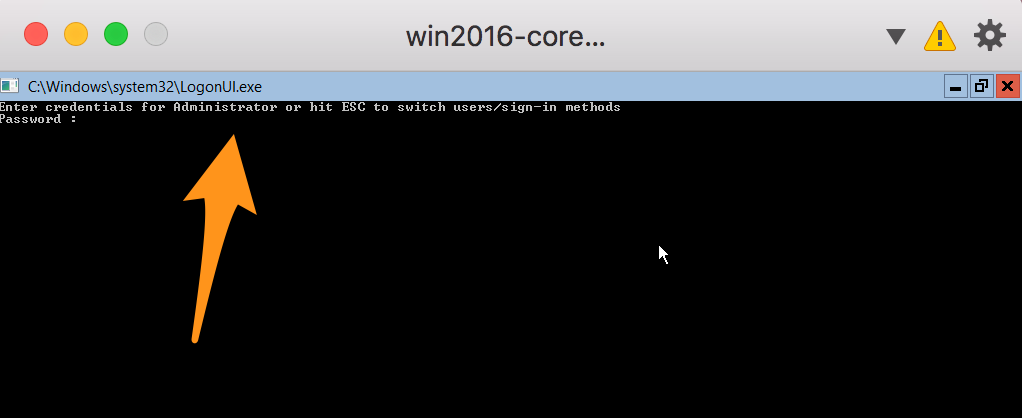
When the install completes you’ll have to provide a new password for the Administrator account, and then you’re left at the command line. When you log in next you’ll see a basic login command prompt:
Install Windows Updates
You’ll need the latest Windows updates. On Windows Server Core, run sconfig from the command line to get to the config screen:
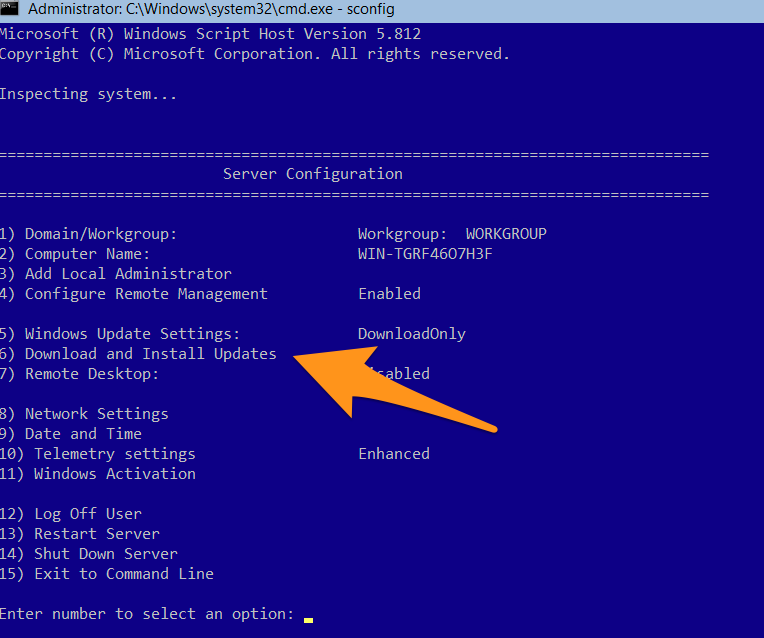
Then hit 6 for updates, A to download all updates, and A again to install all updates. This will take a while, and will probably need a restart. If your cmd skills are rusty, shutdown /r /t 0 initiates an immediate restart.
When the VM comes back up, you have a clean updated install of Windows Server 2016 and that’s a good time to take a checkpoint (or snapshot), so you could create a new VM from a clean install.
Install Docker
Microsoft have a OneGet provider for installing Docker, and this is all scriptable. Run powershell from the command line, and then these commands to set up the OneGet provider and install the Docker module:
Install-PackageProvider -Name NuGet -RequiredVersion 2.8.5.208 -Force

Install-Module -Name DockerMsftProvider -Repository PSGallery -RequiredVersion 1.0.0.1 -Force

Install-Package -Name docker -ProviderName DockerMsftProvider -RequiredVersion 1.13.1 -Force
I use specific versions here so I know exactly what I’m installing - Docker 1.13.1 is the latest release right now. I keep an up-to-date version of the Docker install script on GitHub.
This needs a restart too. In PowerShell use the Restart-Computer cmdlet. When your VM is back you have the latest version of Docker installed, and that’s a good point for another snapshot.
Pull the Base Images
Everything you run in Docker on Windows will be based from either the Windows Server Core image or the Nano Server image - both are maintained by Microsoft on Docker Hub. You’ll need them, so might as well pull them now:
docker pull microsoft/windowsservercore:10.0.14393.693

docker pull microsoft/nanoserver:10.0.14393.693
I’ve got specific versions again - Microsoft release a new version of the Windows Docker images every month, with the latest security patches applied. You should build your own images from a known base version. This script to pull the latest Windows Docker images is kept up-to-date.
Now you have a basic setup ready to run containers, so another snapshot is good. At this point with the base images expanded, your disk will be around 25GB. That’s a manageable size for keeping on a USB stick.
You can clone more VMs from this snapshot, but you’ll need to give them a unique Docker engine ID. On a cloned machine, stop the Docker service, delete the key file and restart the service to generate a new engine ID:
Stop-Service docker
rm C:\ProgramData\docker\config\key.json
Start-Service Docker
Make Docker Securely Accessible from Outside
The Docker API can be exposed over TCP/IP, so on your dev box you’ll access the Docker engine running in the VM over your virtual or physical network. Server Core has the firewall running by default, so you’ll need to set up rules to allow any ports you’ll need, or take the brute force approach of disabling the firewall in the VM:
Set-NetFirewallProfile -Profile Domain,Public,Private -Enabled False
You can set up an insecure, plaintext connection between the Docker client and the engine, but the rest of the Docker platform is secure by default, so you should secure the VM connection. To do that you need to generate server and client certificates, and configure the server to use TLS for the API.
There’s no need to do that manually. Docker Captain Stefan Scherer has built a Docker image which configures your Docker engine to run securely over TLS. All you need to do is run a container from Stefan’s image, passing in the details of your VM:
mkdir -p C:\certs\vm\client

docker run --rm `
 -e SERVER_NAME=$(hostname) `
 -e IP_ADDRESSES=127.0.0.1,192.168.1.215,169.254.101.27 `
 -v 'C:\ProgramData\docker:C:\ProgramData\docker' `
 -v 'C:\certs\vm\client:C:\Users\ContainerAdministrator\.docker' `
 stefanscherer/dockertls-windows
Stefan’s image has all the logic to generate certificates and configure the Docker engine. Mapping the volumes means the container puts the files in the right place, and the client certificates are copied to the new folder on the VM.
The IP address list is used in the certificates. If the IP address for your VM changes then the certificates won’t match and you’ll need to add them to your trusted store, or run a container from Stefan’s image again, to generate new certs for the new IP.
I use two NICs in my VMs - one is host-only, so the VM can connect to the dev box on a virtual network even when the box itself is not on the network, and one which is external, using the dev box’s network adapter so my VM gets an IP address from the router. Both those IPs go into the list.
Copy the Client Certificates onto the Host
The VM is all set up now, and you won’t need to connect to it again, unless you need to update Windows or the Docker engine. From now on you’ll use the Docker CLI on the dev box to manage containers running remotely on the VM, but you need those client certs. How you get them out will depend on your setup - I use a network share.
You can make a network directory share on your dev machine, or use the Samba server you have running in a Docker container on the Linux server in your garage. You can browse to the network directory in PowerShell on the VM and copy the client certs there. Assuming your share is on 192.168.1.50:
cd \\192.168.1.50\certs\win2016-vm
cp C:\certs\vm\client\* .
Now you can copy the certs onto your client machine, and then you can securely manage Docker on the VM.
If you snapshot the VM now and clone it, any clones will have the same TLS certs. That’s not a good idea - every engine should have dedicated server certs, and Docker lets you specify which client certs to use for the engine you connect to.
Configure the Docker Client to Connect to the VM
On your dev machine, you’ll need the Docker client and Docker Compose to manage the VM. Docker for Mac and Docker for Windows set those up for you. If your machine doesn’t support D4M or D4W, you can download the Docker CLI (or 32-bit Docker CLI) and Docker Compose individually.
Docker uses environment variables to point the client to a remote engine, which is how to use the local client to manage Docker on the VM. If you’re likely to work with multiple remote engines, you’ll want a script to set up each environment.
Here’s how that looks in Bash for OS/X and Linux client machines - in my case the Windows Server 2016 VM has an IP address of 192.168.1.97:
#!/bin/bash

export DOCKER_HOST=tcp://192.168.1.97:2376
export DOCKER_TLS_VERIFY=1
export DOCKER_CERT_PATH=/Users/elton/certs/win2016-vm
Run it with . ./script.sh to import the environment variables, and run unset ${!DOCKER_*} to remove all the variables.
In PowerShell it’s:
$env:DOCKER_HOST='tcp://192.168.1.215:2376'
$env:DOCKER_TLS_VERIFY='1'
$env:DOCKER_CERT_PATH='C:\certs\win2016-vm'
And the unset equivalent is Get-ChildItem Env:DOCKER_* | Remove-Item.
Test your connection with docker version, and you’ll see the engine is running on Windows x64. In my case the host running the VM is a Mac, so the client architecture is Darwin:
elton$ docker version
Client:
 Version: 1.13.1
 API version: 1.26
 Go version: go1.7.5
 Git commit: 092cba3
 Built: Wed Feb 8 08:47:51 2017
 OS/Arch: darwin/amd64

Server:
 Version: 1.13.1-cs1
 API version: 1.26 (minimum version 1.24)
 Go version: go1.7.5
 Git commit: 8709b81
 Built: Thu Feb 9 02:05:36 2017
 OS/Arch: windows/amd64
 Experimental: false
If you have a Windows client, you’ll see an error message with every
dockercommand, Unable to use system certificate pool: crypto/x509: system root pool is not available on Windows. That’s because we’re using certs on disk rather than Windows’ certificate store, and you can ignore the warning.
Dockerize!
Now you have a nice lightweight VM to run your Windows containers, and all the source files stay on your dev box. docker build sends the local directory to the remote engine as the build context, and docker-compose uses the local compose file. All that gets stored on the VM are Docker images and volumes.
You shouldn’t need to access the VM for anything on a day-to-day basis, and remember that the VM is disposable - it has nothing installed except Docker, so you can replicate the state in a new VM just by pulling the same images.
For images you use all the time, list them all as services in a Docker Compose file and run
docker-compose pullto download them in one hit.
Core edition will happily run with 4GB of RAM, and the minimal runtime means it starts and stops quickly. CPU and disk requirements are much smaller than the full Server edition, so you can have multiple VMs running concurrently. They could be in swarm mode when Windows Server 2016 supports overlay networking - or you could have one VM running as a standalone Docker engine, and another running as a single-node swarm. Switching between engines just means running the script to set your Docker environment variables.
If your VM platform supports it, you can run the Windows VM(s) in headless mode as you don’t need to connect to them directly. If you do need access to Windows then connecting to the VM is much easier than PowerShell remoting, so don’t forget your admin password. And when you’re done the command to exit your session is logoff.
Comments