
6 Things You Can Do with Docker in Windows Server 2019 That You Couldn’t Do in Windows Server 2016
There are thousands of Windows Server 2016 machines running Docker containers in production, but there’s always been a small functionality gap between Windows containers and Linux containers. Windows Server 2019 closes most of that gap, so Windows Docker containers are pretty much on a par with Linux containers.
UPDATE: the second edition of my book Docker on Windows is out now. It focuses entirely on Windows Server 2019
Here are the main new features. All the Docker images in the snippets are from my dockerfiles-windows repo on GitHub, and they’re all published to my sixeyed org on Docker Hub so you can follow along.
Windows Server 2019 uses the OS version
1809. A Windows 10 Update is rolling out right now which adds this kernel to Windows 10, so you can use these images on Windows Server 2019 or Windows 10 if you’re on 1809 or higher (winverwill tell you this).
1. Published ports are accessible on localhost
Windows containers let you publish ports in the usual way, so when network traffic comes into your machine on a specific port, Docker directs it to the container to handle. But on Windows Server 2016 you can only access the port externally, not using using localhost on the machine.
Docker Desktop on Windows 10 has had a fix for this for a while, so you can use localhost on the desktop, but the network stuff is happening in Docker Desktop not in the OS layer.
I wrote about this in Published Ports on Windows Containers Don’t Do Loopback
Now in Windows Server 2019, the networking stack in the OS has been updated to support loopback. So you can do this:
PS> docker container run -d -p 8041:80 sixeyed/nginx:windowsservercore-1809
103b486d29818e02bd0da8ab42d854c42179de3e116bf4bd38c1840adca9cde9

PS> iwr -useb -method Head http://localhost:8041

StatusCode : 200
That’s very handy if you develop in a VM, or if you’re using Docker in your CI process. On Windows Server 2016 you had to get the container’s IP address to access it from the host, but now you can use the published port directly from localhost.
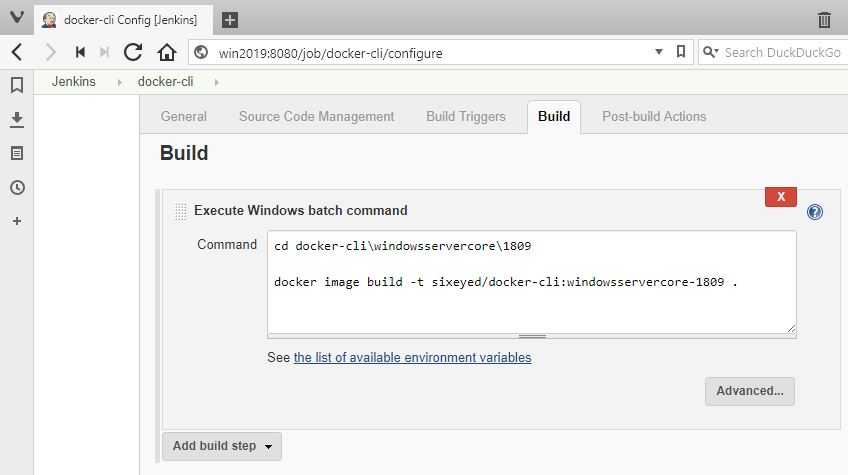
2. The Docker API is available through named pipes
There are lots of scenarios where you want to run software in a container which has access to the Docker API on the host where its running. CI is a great example - if you use multi-stage builds for your apps then you can compile from source inside containers, and you have no need to set up a CI server with a whole bunch of tools.
Instead you can run Jenkins in a container, and use docker or docker-compose commands for your build. In your build steps, you just run the same Docker commands you run on the desktop.
But in Windows Server 2016 you had to access the Docker API over TCP/IP, meaning you had to expose the Docker API and secure it with TLS certificates (probably using Stefan Scherer’s instructions). Then you’d parameterise your build commands so you can pass in the Docker API configuration:
& docker $dockerConfig image build $buildArg -t $fullTag .
And in the build job, you set up the configuration for the Docker API in the $dockerConfig variable - complete with certs stored as secret files in Jenkins - before calling the build script:
$dockerConfig = '--host', 'tcp://192.168.160.1:2376', '--tlsverify', `
          '--tlscacert', $env:DOCKER_CA,'--tlscert', $env:DOCKER_CERT, '--tlskey', $env:DOCKER_KEY
It’s a bit ugly and it means you need to know the IP address or hostname of the machine where the container is running. Which gets a lot harder when you’re running in Swarm mode.
Now in Windows Server 2019, you can mount the named pipe for the Docker API as a volume. The pipe is the default endpoint for the Docker CLI to get to the Docker API running on the same machine, and it also works for containers accessing the Docker API on the machine where they’re running:
docker container run -d `
  -p 8080:8080 `
  -v C:\jenkins:C:\data `
  -v \\.\pipe\docker_engine:\\.\pipe\docker_engine `
  sixeyed/jenkins-sample:windowsservercore-1809
This lets you use normal docker and docker-compose commands with no additional configuration, because the Docker CLI inside the container can reach the host API from the named pipe. Your Jenkins job steps are much simpler:
You no longer need to expose your Docker API over TCP/IP, which means you don’t need to create, apply and cycle TLS certs, and your client inside the container doesn’t need to know the details of the host where it’s running.
3. Ingress networking is supported in Swarm Mode
Docker Swarm mode is a very simple but hugely powerful container orchestrator - you join together multiple servers running Docker into a single swarm, and then you manage your workload by deploying stacks to the swarm.
Windows Server 2019 is also likely to be the first version to support Kubernetes with Windows nodes when it GAs (expected to happen in the next few months)
Docker Swarm takes care of scheduling containers to run on nodes in the swarm, and maintaining your requested service level. If you specify a web app should run across 10 containers for HA and scale, then Docker will start 10 containers across the swarm, and if one server goes down and takes 3 containers with it, Docker will spin up replacements on the remaining servers.
You also get load balancing for incoming traffic across your containers using Docker’s ingress network routing mesh. This lets you do two very useful things:
- you can over-provision your service, so there are more containers running it than there are nodes in your swarm. Some or all nodes will run multiple replicas of the service container.
- you can under-provision your service, so there are fewer containers running your service than there are nodes in the swarm. Some nodes will run zero replicas of the service, others will run a single replica.
The ingress network means traffic can come into any node of the swarm, and Docker will route it to a listening container. If there are zero replicas running on the node that received the request, it gets silently redirected to another node where the are containers running. If there are multiple replicas, Docker takes care of load-balancing.
I go into a lot more detail on this in my course Managing Load Balancing and Scale in Docker Swarm Mode Clusters
It’s a great feature, but it wasn’t supported for Windows containers in Server 2016. You had to use host-mode publishing, which means you can only run one container per server if you want to have public accessible ports. (In practice people run Windows workloads as global services, or front-end them with a reverse proxy running on Linux containers in a hybrid swarm).
Now Windows Server 2019 supports Docker’s ingress mode, so you can run your containers with the service level you need, and scale up or down knowing Docker will keep directing and load-balancing the traffic.
You can see this by switching to swarm mode and running multiple replicas of my simple .NET Core whoami service:
docker swarm init --advertise-addr 127.0.0.1

docker service create `
  --publish 8070:80 `
  --replicas 5 `
  sixeyed/whoami-dotnet:nanoserver-1809
You’ll see output like this, telling you that all the replicas are running:
overall progress: 5 out of 5 tasks
1/5: running [==================================================>]
2/5: running [==================================================>]
3/5: running [==================================================>]
4/5: running [==================================================>]
5/5: running [==================================================>]
verify: Service converged
In swarm mode you can’t use
localhostto access the published port. You need to send traffic externally to have it reach the ingress network.
On a different machine, you can make client requests to the swarm, and see responses from different containers - even though they’re all running on a single server:
$ hostname
DESKTOP-BBD7UUM
$
$ for ((i=1;i<=5;i++)); do curl http://win2019:8070; printf "\n"; done
I'm fccdf0ecea5b running on Microsoft Windows 10.0.17763
I'm b00baa697176 running on Microsoft Windows 10.0.17763
I'm 60a2be72474e running on Microsoft Windows 10.0.17763
I'm 30edb8b1b302 running on Microsoft Windows 10.0.17763
I'm 45c110bc5d34 running on Microsoft Windows 10.0.17763
4. Service Discovery with VIP
A second enhancement for Docker Swarm mode. Swarm provides service discovery via DNS, so containers can refer to each other by the service name and Docker resolves that to a container IP address. It’s a very simple way to connect services, using existing technology so it’s transparent to apps that they’re running in containers.
There are two modes for service discovery: VIP and DNSRR. VIP uses a virtual IP address - when a container makes a DNS query, it gets a single IP address in the response which is a virtual address. The networking layer actually routes it one of the containers running service replicas. DNSRR is DNS round-robin - the DNS response contains a list of all the container IP address, in a random order to provide load-balancing.
VIP is the better option because it doesn’t cause any issues for clients which cache DNS responses (which is almost every DNS client). If containers are replaced in the service, the virtual IP address stays the same, and client requests will always get routed to an active container. DNSRR can cause issues if clients cache the response, because the response is a single container’s IP address, and when that container gets replaced the client can’t reach the service - until the DNS caches expires and it gets a new response.
There are good uses for DNSRR, especially for clustered technologies which use DNS to discover other nodes in the cluster. Managing Load Balancing and Scale in Docker Swarm Mode Clusters covers this too.
Windows Server 2016 only supported DNSRR service discovery, but 2019 supports VIP too. Together with ingress networking, it means you can run highly available, highly scalable and resilient services in swarm mode.
I’ve added 1809 variants to the legendary Docker example voting app. You can run the app on a Windows 1809 swarm with this Docker stack file which uses ingress networking and VIP service discovery:
iwr -useb -outf docker-stack-windows-1809.yml `
 https://raw.githubusercontent.com/sixeyed/example-voting-app/master/docker-stack-windows-1809.yml

docker stack deploy -c .\docker-stack-windows-1809.yml vote
Now you can browse to the voting app on port 5000 on any node in the swarm, and one of the four voting app containers will process the request:
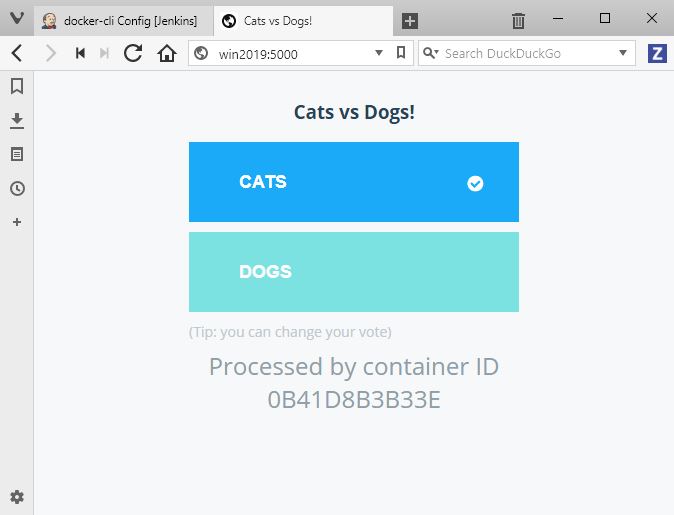
Make your choice and the app posts a message to the CNCF-incubating NATS message queue running in a container, then one of the three message handler containers will process the message and store the data in the MySQL-compatible TiDB database - running in a container. Browse to port 5001 and you’ll see the totals from the vote result app.
These are all tiny images built on the 1809 Windows Nano Server base image
5. Volume mounts have usable directory paths
Docker volumes are how you separate storage from the lifecycle of your containers. You attach a volume to a container, and it surfaces as a directory in the container’s filesystem. Your app writes to C:\jenkins (or whatever path you mount) and the data actually gets stored in the volume, which could be storage on the Docker host - like a RAID array on the server - or a separate storage unit in the datacenter, or a cloud storage service.
The mount inside the container should be transparent to the app, but actually in Windows Server 2016 the implementation used symlink directories, and that caused a few problems.
I wrote about the workaround for this - using a separate
G:\drive mount
Here’s the basic problem - start by running an interactive Windows Server Core 2016 container, with a Docker volume mounting a local directory to the target C:\mount inside the container:
docker container run -it --rm `
  -v C:\temp:C:\mount `
  microsoft/windowsservercore:ltsc2016
Check the directory listing in the container, and you’ll see C:\mount is actually of type SYMLINKD, and it maps to a crazy file path starting [\\?\ContainerMappedDirectories:
Microsoft Windows [Version 10.0.14393]
(c) 2016 Microsoft Corporation. All rights reserved.

C:\>dir C:\
 Volume in drive C has no label.
 Volume Serial Number is 5AC2-AFC5

 Directory of C:\

11/22/2016 11:45 PM 1,894 License.txt
10/22/2018 01:01 PM <SYMLINKD> mount [\\?\ContainerMappedDirectories\C4CCB043-FA0A-49DE-88F0-F408917EC284]
06/28/2018 07:55 PM <DIR> PerfLogs
06/28/2018 08:04 PM <DIR> Program Files
07/16/2016 02:18 PM <DIR> Program Files (x86)
10/22/2018 01:01 PM <DIR> Users
10/22/2018 01:01 PM <DIR> Windows
               1 File(s) 1,894 bytes
               6 Dir(s) 21,218,250,752 bytes free
This causes problems with apps where the underlying language tries to resolve the symlink and use the target path, because they get the double-backslash and the question mark and they’re not happy. The G:\ workaround is simple but hacky.
It’s no longer a problem in Windows Server 2019. Run the same command on an 1809 machine running Docker:
docker container run -it --rm `
  -v C:\temp:C:\mount `
   mcr.microsoft.com/windows/servercore:1809
And now the listing shows C:\mount as a standard directory:
Microsoft Windows [Version 10.0.17763.1]
(c) 2018 Microsoft Corporation. All rights reserved.

C:\>dir C:\
 Volume in drive C has no label.
 Volume Serial Number is 961D-F4E8

 Directory of C:\

09/15/2018 10:42 AM 5,510 License.txt
10/04/2018 11:08 AM <DIR> mount
09/15/2018 05:44 PM <DIR> Program Files
09/15/2018 10:42 AM <DIR> Program Files (x86)
09/15/2018 10:45 AM <DIR> Users
10/22/2018 01:05 PM <DIR> Windows
               1 File(s) 5,510 bytes
               5 Dir(s) 21,242,155,008 bytes free
It’s still a volume using storage external to the container, managed by Docker, but now it’s completely transparent to the app. Compare my Jenkins Dockerfile for Windows Server 2019 with my Jenkins Dockerfile for Windows Server 2016 and you’ll see it makes for much easier reading.
6. Volume mounts can overwrite existing directories
Windows Server 2016 had a couple of other volume quirks. One was that you couldn’t use a target directory for a volume mount if that directory already existed from the Docker image.
That’s problematic for a lot of apps where there’s a config directory which is shipped with a default configuration file in the image. On Linux you can run the container and overwrite the config directory with the contents of your volume. On Windows 2016 you can’t do that, so you’d have to write a Dockerfile which packaged your custom config.
Or with web servers, if you want to use the default image but provide your own content from the volume - you’d get an error from Windows Server 2016:
PS> docker container run -d `
  -p 8041:80 `
  -v C:\web:C:\nginx\html `
  sixeyed/nginx:windowsservercore-ltsc2016

13f9f189ef9b5a73b700b79556aa002fd8fb3ce5f70ced21e364d5b4ac708446

C:\Program Files\Docker\docker.exe: Error response from daemon: container 13f9f189ef9b5a73b700b79556aa002fd8fb3ce5f70ced21e364d5b4ac708446 encountered an error during CreateContainer: failure in a Windows system call: The directory is not empty. (0x91) extra info:
...
The error message you get - The directory is not empty - also falls into the “it’s true, but it’s not really helpful” category.
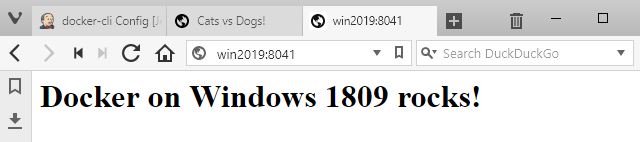
This limitation is gone in Windows Server 2019. Now you can mount a volume over an existing directory and the contents get replaced, so the container sees the contents of the volume and not the contents from the image:
PS> docker container run -d `
  -p 8041:80 `
  -v C:\web:C:\nginx\html `
  sixeyed/nginx:windowsservercore-1809

42ed3441e2e2cebc37cac6ecac927ece45c65f877d4c072be4f5ff2dcef7ddcf
No errors. And now when I browse to the app, I see my web page instead of the default Nginx page:
One quirk remains. You still can’t mount a single file as a volume, you’ll get
invalid mount config for type "bind": source path must be a directory
Sounds like the book Docker on Windows needs updating
That’ll be the five-star rated book Docker on Windows - available now on Amazon :)
Yes, the first edition was written for Windows Server 2016. I’m working on updating it now. The second edition will cover all the new features and more, as well as updating all the demos and code snippets to run on Windows 1809. Stay tuned…
Comments