Dockerizing Nerd Dinner: Part 1, Running a Legacy ASP.NET App in a Windows Container
Update! The Nerd Dinner project has moved to my book Docker on Windows. And I have a Pluralsight course on Modernizing .NET Apps with Docker.
FROM microsoft/iis - a single line of code which has the potential to change the way you build, ship, run, test, support and even design ASP.NET applications.
It’s how you start to package “legacy” ASP.NET apps in Docker images, so you can run them in containers on Windows 10 and Windows Server 2016. Once you’ve packaged your app into a container image you have:
- a central artifact which dev and ops teams can work with, which helps you transition to DevOps;
- an app that runs the same on your laptop, on the server, on Azure, on AWS, which helps you move to the cloud;
- an app platform which supports distributed systems, which helps you break down the monolith into microservices.
Even if you don’t have a roadmap to microservices, DevOps or the cloud, Dockerizing your existing apps still has the potential to give you a huge return on a small investment. Packaging apps as images can eliminate deployment problems between environments, because every environment runs the exact same thing. Running applications in containers lets you condense many more apps on your servers, making the most of your compute resources while keeping your apps isolated.
And with Docker you can join multiple machines into a managed cluster, called a Docker Swarm. Then Docker manages where your apps run, and if a server which is running some containers goes down, Docker will start new instances of those containers on another host.
There’s plenty more functionality in Docker which all helps make your delivery faster and more reliable, and reduces your support overhead. It’s a great technology which is all the more powerful because it’s not just for greenfield apps which start with a blank-page architecture. This is the first post in a series which will look at Dockerizing an existing - actually, a pretty old - ASP.NET Web app.
TL; DR
Edit - updated to include workaround for [Published Ports On Windows Containers Don't Do Loopback](https://blog.sixeyed.com/published-ports-on-windows-containers-dont-do-loopback/()
docker run -d -p 80:8081 --name nd sixeyed/nerd-dinner:part1
$ip = docker inspect --format '' nd
start "http://$ip"
Remember Nerd Dinner?
Nerd Dinner was a showcase app used to demonstrate what you could do with ASP.NET MVC. It went through a few iterations on CodePlex, finishing up with an ASP.NET MVC 4 version with the last commit to the master branch on 6th May 2013.
It’s a perfect example of an app that works just fine but hasn’t been touched for a while, where the people originally involved in building it have moved on to bigger and brighter things. I figure if you can Dockerize a .NET app that hasn’t been touched for 3.5 years, you can Dockerize pretty much anything.
Dockerize. Transitive verb. To package your application into an image and run it in a container. Thereby making it awesome.
First things first, I’ve cloned the source and put it on GitHub: sixeyed/nerd-dinner. The master branch is a cut of the last CodePlex commit, with the solution upgraded for VS2015. No other changes, so if you git clone https://github.com/sixeyed/nerd-dinner.git you get fundamentally the same code as the current production release.
In this first post we’re not going to change the code at all, just package and run it using Docker. The dockerize-part1 branch has no code changes, it just adds the Docker setup to build the image. In the rest of the series we’ll see how we can change it to make more use of the Docker platform to modernize the app.
Let’s Dockerize!
I’ll be using Windows Server 2016 Core for my Docker host, having followed my own instructions to get Docker on a Windows VM. Server 2016 has an Evaluation release, which will have an upgrade path to RTM, so the time you spend building the environment now won’t be wasted.
We’ll write a Dockerfile and add all the steps to package our application, so we can build it into a self-contained image for running Nerd Dinner.
Installing Pre-requisites
Docker images start from a known base image, and from that you layer on your changes to end up with a final image that contains your app, your app’s dependencies, the application platform, it’s dependencies, and the underlying operating system. To run full ASP.NET apps (and any .NET Framework app), we need to start with the microsoft/windowsservercore image. That image is a flavour of Windows Server Core, so you can run PowerShell scripts to add any Windows features you need.
ASP.NET
For Nerd Dinner, we know we’ll need IIS set up, and Microsoft have another image on the Hub - microsoft/iis - which is built from microsoft/windowsservercore and adds IIS, so we can use that as our base image and save the work to install IIS. Here’s how the Dockerfile for Nerd Dinner starts:
# escape=`

FROM microsoft/iis:10.0.14393.206
SHELL ["powershell", "-command"]

# Install ASP.NET
RUN Install-WindowsFeature NET-Framework-45-ASPNET; `
    Install-WindowsFeature Web-Asp-Net45
I won’t delve into the Dockerfile syntax here, but that should be fairly clear:
- start from the IIS base image (a specific version, so we know whet we’re getting);
- use PowerShell as the shell for future commands in the Dockerfile;
- run cmdlets to install the ASP.NET Windows features.
(If you’re curious about the escape line, that’s to do with Windows, Dockerfiles and the Backtick Backslash Backlash).
SQL Server LocalDB
Nerd Dinner uses SQL Server 2012 LocalDB (I told you it was old). That installs with an MSI which luckily you can still download. It’s a common pattern in Dockerfiles to download a dependency from the web, and save it into the image so it can be installed. We can do the download with another cmdlet:
RUN Invoke-WebRequest -OutFile c:\SqlLocalDB.msi -Uri http://download.microsoft.com/download/8/D/D/8DD7BDBA-CEF7-4D8E-8C16-D9F69527F909/ENU/x64/SqlLocalDB.MSI
This particular MSI has some quirks with unattended installation on Windows Server Core; we can do what we need to in the Dockerfile, but we have to be very careful with the syntax when we invoke msiexec. I’m using the standard cmd shell here; I advise you not to tamper with this line:
RUN ["cmd", "/S", "/C", "c:\\windows\\syswow64\\msiexec", "/i", "c:\\SqlLocalDB.msi", "IACCEPTSQLLOCALDBLICENSETERMS=YES", "/qn"]
Then back to PowerShell to start LocalDB running:
RUN & 'C:\Program Files\Microsoft SQL Server\110\Tools\Binn\sqllocaldb' start "v11.0"
Configuring IIS
When you run an app in a container, the container is an isolated environment. By default there’s no integration with the host machine. We want web requests which hit the host to be redirected to the container, so we’ll open a custom port to allow that integration with the EXPOSE command:
EXPOSE 8081
Ordinarily a production ASP.NET app would have its own app pool, so it runs in its own process and gets some isolation from anything else running on the box. But this is an image for an application container - the Nerd Dinner app will be the only thing running on it, so we already have isolation at a higher level, and inside the container we can use the default .NET app pool.
We can chain together multiple PowerShell commands for the website setup, removing the default site, creating directories for Nerd Dinner and creating the new website:
RUN Remove-Website -Name 'Default Web Site'; `
    md c:\nerd-dinner; `
    md c:\databases; `
    New-Website -Name 'nerd-dinner' `
                -Port 8081 -PhysicalPath 'c:\nerd-dinner' `
                -ApplicationPool '.NET v4.5'
In many cases, that would be all the setup you need to do - but Nerd Dinner is old and real , and it has some wonky stuff to deal with. Firstly, we need to change some App Pool settings to let IIS use LocalDB:
RUN Import-Module WebAdministration; `
    Set-ItemProperty 'IIS:\AppPools\.NET v4.5' -Name 'processModel.loadUserProfile' -Value 'True'; `
    Set-ItemProperty 'IIS:\AppPools\.NET v4.5' -Name 'processModel.setProfileEnvironment' -Value 'True'
Then in the Web.config there are some custom settings for the system.webServer/handlers section. By default that section’s locked down in IIS, so we need to run appcmd to unlock it:
RUN & c:\windows\system32\inetsrv\appcmd.exe `
      unlock config `
      /section:system.webServer/handlers
That’s the pre-requisites done, so now we need to put the Nerd Dinner application into the image.
Adding the Application
There are two ways to package an application into a Docker image.
Option 1 - build the app as you package it
In this case, you use a base image which contains the development platform as well as the runtime, so in your Docker build you bring in the source code for your app and compile it as one step in building the container image. The plus side of this is you don’t need the dev platform on your host machine, so any machine running Docker can build the app - it’s what powers automated builds on Docker Hub, without Docker having to install Go, .NET Core etc. on their servers.
The downside is a much bigger image, with all the dev tools installed along with your app - unless you carefully clean them up towards the end of the image build.
Option 2 - build the app, then package it
This way you compile the app on your dev machine (or build server) and then copy the compiled application into the Docker image. You end up with a smaller, more focused image. That’s what I’ll be doing with Nerd Dinner.
In Visual Studio the Web project has a default target so when you publish it you get the app built to c:\nerd-dinner. Let’s assume we have a build script which publishes the app and copies the published folder to the same location as the Dockerfile. We know the folder will be there, so we can copy it into a known location in the image:
COPY nerd-dinner c:\nerd-dinner
When Docker runs this line, it will copy the published application folder into the image, which is where we’ve already configured the web site to serve its content. Now everything is ready.
Usually you need a
CMDorENTRYPOINTinstruction at the end of your Dockerfile to tell Docker the process to run when containers start. The IIS base image already sets this up, so we don’t need to do it here.
Building the Image
Here’s the Nerd Dinner Dockerfile in full. With comments it comes in at 35 lines:
# escape=`

FROM microsoft/iis:10.0.14393.206
MAINTAINER Elton Stoneman <elton@sixeyed.com>
SHELL ["powershell", "-command"]

# Install ASP.NET
RUN Install-WindowsFeature NET-Framework-45-ASPNET; `
    Install-WindowsFeature Web-Asp-Net45

# Install SQL Server LocalDB
RUN Invoke-WebRequest -OutFile c:\SqlLocalDB.msi -Uri http://download.microsoft.com/download/8/D/D/8DD7BDBA-CEF7-4D8E-8C16-D9F69527F909/ENU/x64/SqlLocalDB.MSI
RUN ["cmd", "/S", "/C", "c:\\windows\\syswow64\\msiexec", "/i", "c:\\SqlLocalDB.msi", "IACCEPTSQLLOCALDBLICENSETERMS=YES", "/qn"]
RUN & 'C:\Program Files\Microsoft SQL Server\110\Tools\Binn\sqllocaldb' start "v11.0"

# Configure website
EXPOSE 8081
RUN Remove-Website -Name 'Default Web Site'; `
    md c:\nerd-dinner; `
    md c:\databases; `
    New-Website -Name 'nerd-dinner' `
                -Port 8081 -PhysicalPath 'c:\nerd-dinner' `
                -ApplicationPool '.NET v4.5'

# Setup app pool for LocalDB access
RUN Import-Module WebAdministration; `
    Set-ItemProperty 'IIS:\AppPools\.NET v4.5' -Name 'processModel.loadUserProfile' -Value 'True'; `
    Set-ItemProperty 'IIS:\AppPools\.NET v4.5' -Name 'processModel.setProfileEnvironment' -Value 'True'

# Unlock custom config
RUN & c:\windows\system32\inetsrv\appcmd.exe `
      unlock config `
      /section:system.webServer/handlers

COPY nerd-dinner c:\nerd-dinner
We build it into an image with the docker build command. From the location of the dockerfile and the compiled nerd-dinner folder, just run this command to build and name the image:
docker build -t sixeyed/nerd-dinner:part1 .
And the output is a 8.5GB image. Yikes. But Docker images are layered, so if we had Nerd Dinner running on Docker alongside another 20 containerized ASP.NET apps on the same host, they would all use the same 7.5GB IIS base image, the same 300MB ASP.NET layer, and so on for all the common layers. Only the individual app layers would be different, so we could end up with (20 * 100MB) + (1 * 300MB) + (1 * 7500MB) = under 10GB of storage. If we had a VM for each app, we’d need more like 500GB.
Let’s Nerd Dinner!
We want to run Nerd Dinner in a background container, publishing the container port 8081 to the host’s port 80. I’ve pushed my image to the Docker Hub so you can run this command on any Windows 10 or Server 2016 machine with Docker installed, and run Nerd Dinner without having to build your own image:
Edit - updated to include workaround for [Published Ports On Windows Containers Don't Do Loopback](https://blog.sixeyed.com/published-ports-on-windows-containers-dont-do-loopback/()
docker run -d -p 80:8081 --name nd sixeyed/nerd-dinner:part1
docker inspect --format '' nd
The second line tells you the IP address of the container, so you can browse to that and see the app in all its glory:
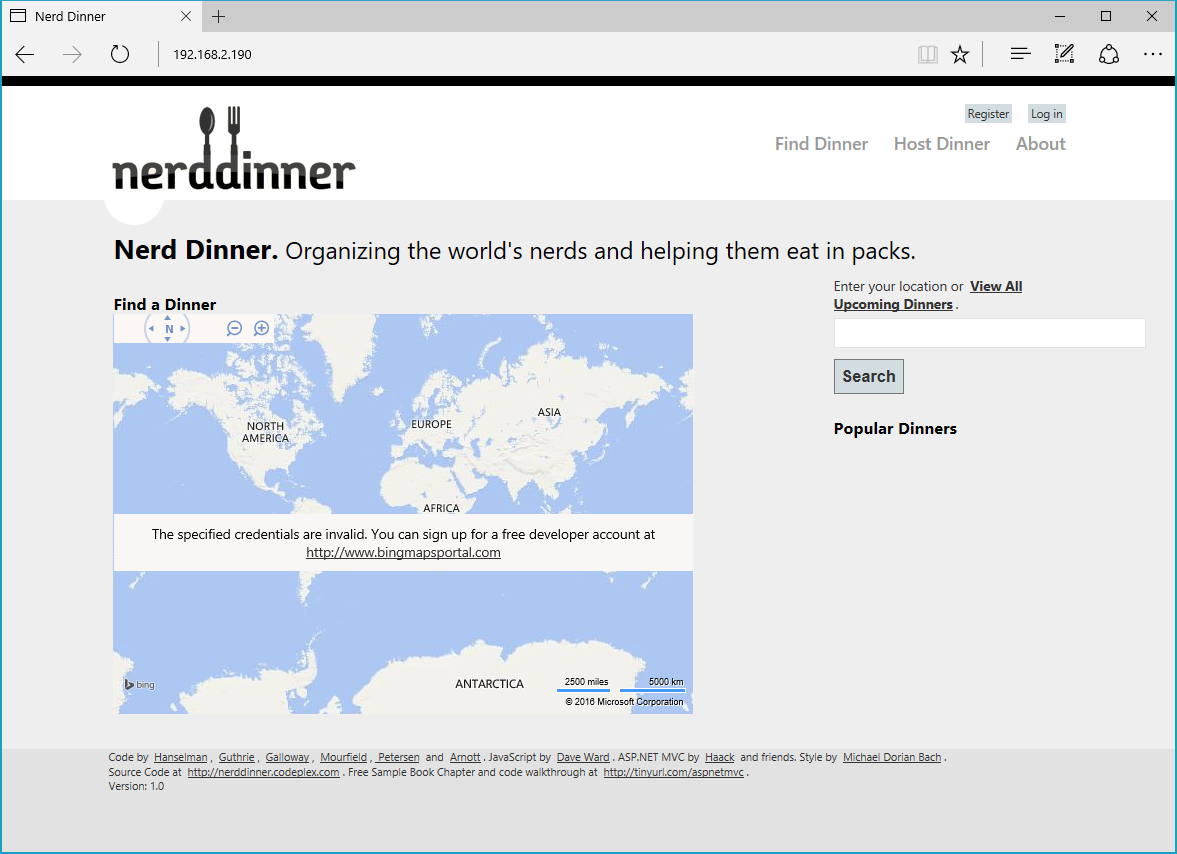
YEAH! We’ve Dockerized a legacy ASP.NET app with a 35 line Dockerfile!
Actually, we’re not quite there. You can register an account, log in, log out and navigate around. But you’ll notice some problems:
- the map doesn’t show;
- if you try to create a new dinner you get an error;
- if you
docker stopthe container and start a new one, all your data will be lost.
We cover those issues in Dockerizing Nerd Dinner: Part 2, Connecting ASP.NET to SQL Server.

Comments