Dockerizing Nerd Dinner: Part 2, Connecting ASP.NET to SQL Server
Update! The Nerd Dinner project has moved to my book Docker on Windows. And I have a Pluralsight course on Modernizing .NET Apps with Docker.
We finished Part 1 with a working version of NerdDinner running in Docker. Moving legacy .NET apps to Docker can be the first step to modernizing them - as containers they can be managed consistently, and the platform lets you easily break down large applications.
There was a to-do list for Part 2, to fix up some issues with the first version:
- the map doesn’t show;
- if you try to create a new dinner you get an error;
- if you
docker stopthe container and start a new one, all your data will be lost.
This is all to do with environment configuration and the problem of having one container do two things - run the app and the database. In this instalment we’ll break the database out into a separate container, and see how to manage configuration.
TL;DR
Assuming you have Docker running on Windows Server 2016, and Docker Compose installed, you can run Part 2 from PowerShell:
# download the Docker Compose file & env files
iwr -UseBasicParsing -OutFile docker-compose.yml https://raw.githubusercontent.com/sixeyed/nerd-dinner/dockerize-part2/docker/docker-compose.yml
iwr -UseBasicParsing -OutFile connection-strings.env https://raw.githubusercontent.com/sixeyed/nerd-dinner/dockerize-part2/docker/connection-strings.env
New-Item secrets.env

# start the db & web containers
docker-compose up -d

# get the name of the web container
$webContainerName = "$((Get-Item -Path ".\" -Verbose).Name)_nerd-dinner-web_1"

# get the IP address of the web container
$ip = docker inspect --format '' $webContainerName

# open Nerd Dinner
start "http://$($ip):8081"
Goals for Part 2
We want to make Nerd Dinner more Docker-friendly. In the Docker world each container should only do one thing, and we want the containers to integrate nicely with the platform, so we can do the whole build, ship, run for any environment.
The existing .NET codebase is tightly bundled - Nerd Dinner expects to use SQL Server LocalDB for storage, and like most ASP.NET web apps it uses Web.config for connection strings and secrets. To get more out of running on Docker we need to make some small changes to the code.
You can browse the commits for Part 2 on GitHub to see exactly what changes I made, but they were straightforward:
- extract the database schema into an SSDT project, so we can deploy it separately
- replace secrets in Web.config with environment variables
Now when you publish the Visual Studio solution, you’ll get a Dacpac file which packages the database, and a NerdDinner folder which contains the Web project. Those are the artifacts we’ll use to build Docker images for the database and the website.
Dockerizing SQL Server
With the Dacpac, it’s easy to build a Dockerfile for the database which packages up the whole schema, so it’s ready to use when you run the container:
# escape=`
FROM microsoft/mssql-server-2016-express-windows
SHELL ["powershell", "-Command", "$ErrorActionPreference = 'Stop';"]

EXPOSE 1433
VOLUME c:\\database
ENV sa_password N3rdD!Nne720^6

WORKDIR c:\\init
COPY . .

CMD ./Initialize-Database.ps1 -sa_password $env:sa_password -db_name NerdDinner -Verbose
This is based from Microsoft’s SQL Server Express 2016 in Docker sample.
In my image, the magic all happens in the Initialize-Database script, which manages state, so you can keep your database files outside of the container and preserve the data when you replace your container.
The approach I used for the database is the same as the Docker Lab for SQL Server. The lab goes into detail on what the initialize script does, and all the scenarios it supports.
I’ve built and pushed that image on the Hub, so you can try it out with:
docker run -d -p 1433:1433 --name nd-db sixeyed/nerd-dinner-db:part2
Then you can connect to the database locally using SSMS, Visual Studio, or any other SQL Server client. You’ll need the IP address of the container (because Published Ports On Windows Containers Don’t Do Loopback), which you can get with:
docker inspect --format '' nd-db
Your connection string is just the IP address, and you use SQL Server authentication - with the username sa and the password N3rdD!Nne720^6. You can interact with the database just like any other SQL Server instance:

(I’m using the entirely excellent SQL Server extension for VS Code).
Now we need to change the app container to use the SQL Server container, rather than bundling its own LocalDB instance.
Dockerizing ASP.NET
There are a few changes to the Dockerfile for the website. I’ve removed the installation of SQL Server LocalDB, so this container is purely for the web app and it will connect to the separate database container.
To make the app portable, we want the connection strings and API key secrets to be manageable by Docker, so they’re captured as environment variables:
ENV BING_MAPS_KEY `
    IP_INFO_DB_KEY `
    AUTH_DB_CONNECTION_STRING `
    APP_DB_CONNECTION_STRING
The auth database and the app database connection strings are kept separate in case we decide to host them separately in the future.
We can store public default values for the connection strings - we know the server name and credentials, because we’ll be deploying the ASP.NET app container and the SQL Server database container in a consistent way through Docker.
The API keys don’t have public default values. In a private codebase we could put in shared dev keys here, but for a public GitHub repo we don’t want to expose them. Docker has a nice way to support that, which we’ll see shortly.
The other change is the entrypoint, which is the command Docker runs when it starts a container from the image:
COPY bootstrap.ps1 \
ENTRYPOINT ./bootstrap.ps1
We need a bootstrap script to set up the environment variables, so we can read the connection strings and API keys from the ASP.NET app.
When Docker starts a Windows container, it creates process-level environment variables for all the
ENVinstructions in the Dockerfile. But IIS only exposes machine-level environment variables to apps, so we need to copy the values machine-wide before starting IIS, which is what this script does.
Running the Distributed Solution
Docker Compose is a client application for running distributed solutions in Docker - you define your whole system in a YAML file, and use the tool to manage it as a single unit.
The docker-compose.yml file for Nerd Dinner is straightforward; even if you’re new to the Docker Compose file format it doesn’t take much explaining:
version: '2'

services:

  nerd-dinner-db:
    image: sixeyed/nerd-dinner-db:part2
    ports:
      - "1433:1433"
    networks:
      - nd

  nerd-dinner-web:
    image: sixeyed/nerd-dinner-web:part2
    ports:
      - "8081:8081"
    env_file:
      - connection-strings.env
      - secrets.env
    depends_on:
      - nerd-dinner-db
    networks:
      - nd

networks:
  nd:
    external:
      name: nat
We have two services, one for the database container and one for the web container. For each we specify the image name and the ports to expose, and the Docker network the containers should connect to.
We explicitly use the
natnetwork, which is created by default by Docker on Windows. Currently you can only have one NAT network on Windows, so we use the existing network to stop Compose trying to create a new one, which would fail.
The interesting part is the env-file where we specify two files which contain environment variables. These values will get passed to the web container when it starts, and the bootstrap script will make them available to ASP.NET.
If you clone the repo you’ll see that there’s no secrets.env because those API keys are secret. If you want to run locally with full functionality, create a secrets.env file with your keys:
BING_MAPS_KEY=[key from https://www.bingmapsportal.com/Application#]
IP_INFO_DB_KEY=[key from http://ipinfodb.com/account.php]
There is a connection-strings.env in the repo, which has the default values for connecting to the database container:
AUTH_DB_CONNECTION_STRING=Data Source=nerd-dinner-db,1433;Initial Catalog=NerdDinner;User Id=sa;Password=N3rdD!Nne720^6

APP_DB_CONNECTION_STRING=Data Source=nerd-dinner-db,1433;Initial Catalog=NerdDinner;User Id=sa;Password=N3rdD!Nne720^6;MultipleActiveResultSets=True
The server name for the database in the connection string is nerd-dinner-db which is the name of the service in the Compose file. Docker has a built-in DNS server so containers can refer to each other by name. We could replace the database with a new container which had a different IP address, and the app would still work because it resolves the container by name.
There are a couple of things you need to know about that.
Windows Networking and Docker DNS
Right now, Docker’s DNS resolution doesn’t work on Windows 10, only on Windows Server 2016. And you need a Windows tweak in the Dockerfile for any images which will be using the DNS service:
RUN set-itemproperty -path 'HKLM:\SYSTEM\CurrentControlSet\Services\Dnscache\Parameters' -Name ServerPriorityTimeLimit -Value 0 -Type DWord
That reduces the DNS cache in Windows to 0, so it always looks up addresses from the DNS server - in this case, the Docker Engine. Without that, you won’t be able to connect containers by hostname.
All credit to Michael Friis from Docker who worked through this fix with his MusicStore sample running in Docker on Windows.
Let’s Nerd Dinner!
The app is fully functional now, with the data stored in a separate container which uses Docker Volumes for the database files to support dev, test and production deployments.
To run the solution, just start the containers in the background using Docker Compose, from the location where your docker-compose.yml file is:
docker-compose up -d
Compose will start both containers. The first time you run the db container it will deploy the database from the Dacpac, so that will take a minute or so. Then you need to docker inspect the web container to get the IP address, and you can browse to port 8081 to see Nerd Dinner.
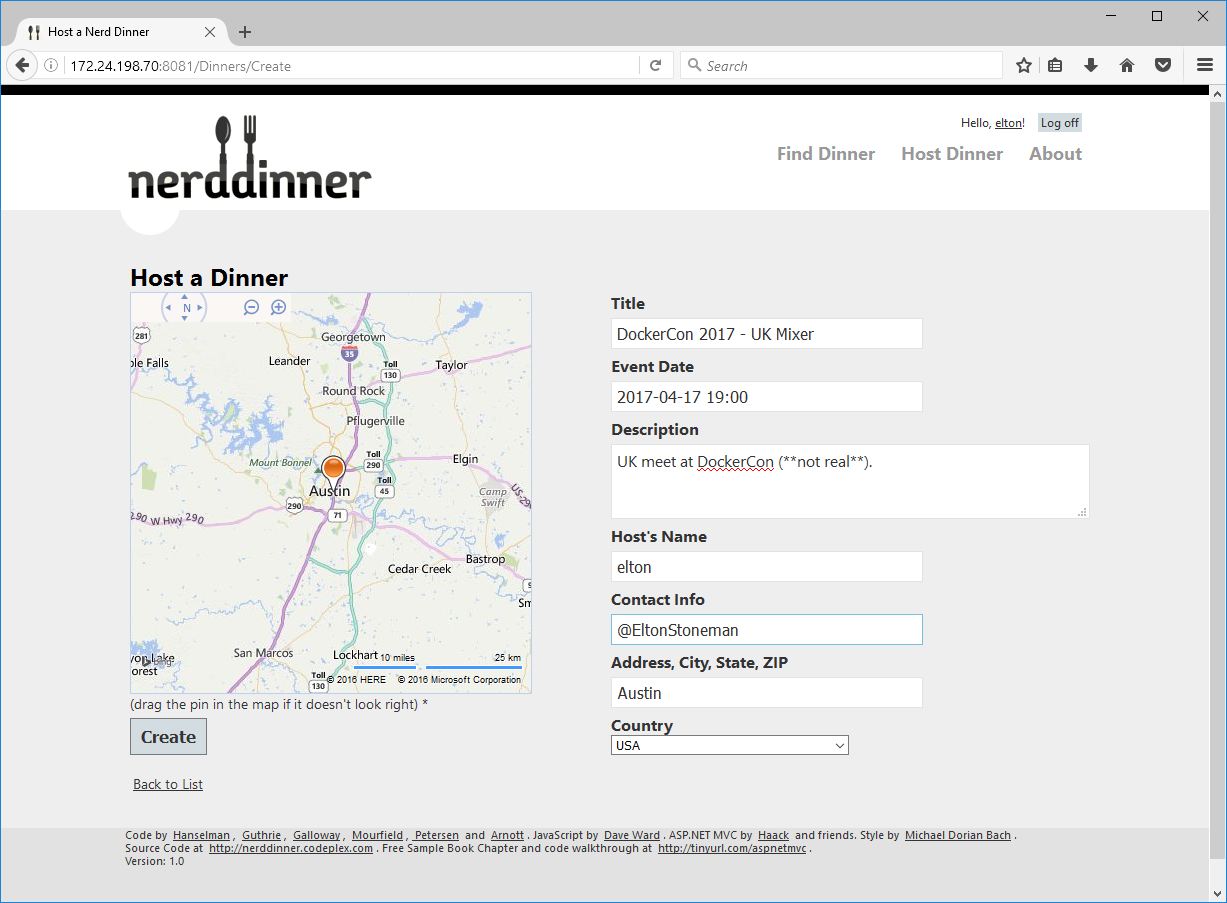
Now you can register an account, log in, and create dinners. When you create a dinner and add a location in the Address, City, State, ZIP field the map will zoom to the location:
You can stop containers and start them again and your data is safe:
docker-compose stop
docker-compose start
The new containers will have new IP addresses, but browse to the web container and you’ll see the dinners you created:
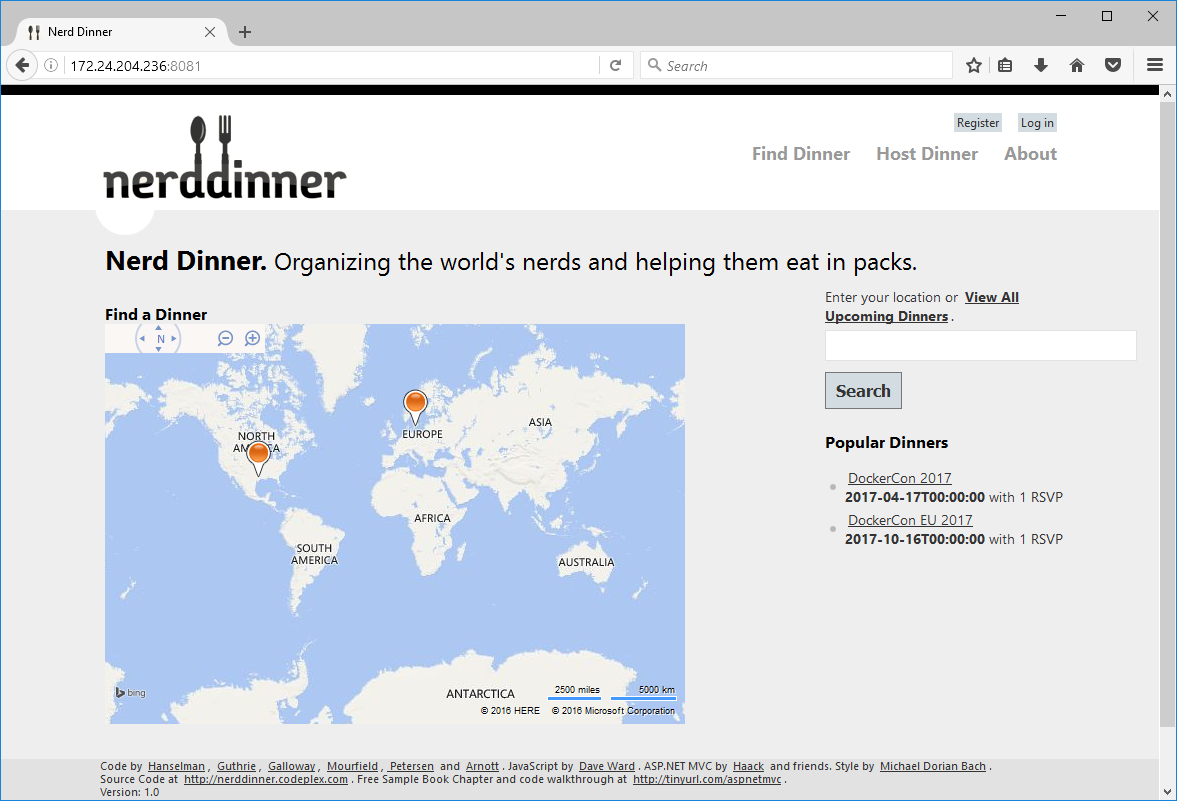
(You can modify the Compose file to use a host mount for the database volume, so your data is safe even if you remove the containers and create new ones).
Now we have Nerd Dinner running in Docker like it should!
This is our baseline for modernizing Nerd Dinner. We can package and run it consistently in different environments and upgrade both the app and the database schema in safe and repeatable ways.
We can carry on with the roadmap now, but before we get on to splitting out components we should really get CI/CD in place. So that will be Part 2.5 (coming soon).


Comments